Amazon Sumerian Hosts
For a general introduction to Amazon Sumerian Hosts as well as other example implementations of utilizing the core package, refer to the primary repository
Amazon Sumerian Hosts is an experimental open source project that aims to make it easy to create interactive animated 3D characters that can be rendered on the Web and leverage AWS Services such as Amazon Polly. This example package includes everything you need to get started with Amazon Sumerian Hosts utilizing three.js.
See the Getting Started guide for a walkthrough using this method and the API Documentation for more detailed information on the classes and methods available. Amazon Sumerian Hosts is a published npm package, so alternatively you can install in an existing Node.js project by running npm install --save-dev @amazon-sumerian-hosts/three. If you'd like to pull the gitub repository and create your own build, see Building the Repository for prerequisites and instructions on how to do that.
License
This library is licensed under the MIT-0 License. See the LICENSE file. The assets within examples are licensed under the CC-BY-4.0 License. See the LICENSE file.
Getting Started
This guide steps you through the code of the examples/three.html file, a working example demonstrating the features, such as animation and speaking user-entered text, of the Sumerian Host characters running in three.js.
Prerequisites
Before you can run the example, you will need to set up a few thing in your AWS account. For step-by-step instructions on setting up this required infrastructure, see AWS-Infrastructure-Setup.md in the root of this repository.
Getting started in three.js
Note, most of steps below have already been completed for you. They are provided here in order to explain the code in detail.
Step 1. Adding Script Dependencies
Here we will take a look at the scripts necessary for the example code to function:
-
<!--Text to speech dependency-->
<script
    type="text/javascript"
    src="https://sdk.amazonaws.com/js/aws-sdk-2.645.0.min.js"
></script>
The hosts will need to connect to Amazon Polly to convert text into audio assets.
https://sdk.amazonaws.com/js/aws-sdk-2.645.0.min.jsis a minified build of the AWS SDK for Javascript. For the latest version, see the AWS SDK for JavaScript API Reference. -
<!--Three.js dependencies-->
<script src="https://cdn.jsdelivr.net/npm/three@0.127.0/build/three.min.js"></script>
- Note the version after the
@should be the same as found in the packages.json
This will be the core three.js build, and is required to setup a new three.js scene. Make sure to always include this file early as it is a dependency for the GLTFLoader and OrbitControls scripts.
- Note the version after the
-
<!--Host build file-->
<script type="text/javascript" src="../dist/host.three.js"></script>
host.three.js is the build file of the Amazon Sumerian Hosts repository that is specific to the three.js rendering engine. It must be included after the three.min.js build file. This will make a module called
HOSTavailable to any scripts included after this.
Now we'll move on to the body of the html file.
Step 2. Add a loading screen
Our example is going to load several glTF assets so there will be a short time where there is no host visible in the scene. We will add a div tag styled with an image and a loading spinner to show while the assets are being loaded.
-
<!--Loading screen-->
<div id="loadScreen">
  <div id="loader"></div>
</div>
The outer div with id "loadScreen" is styled with a background image that fills the screen.
-
#loadScreen {
  display: flex;
  align-items: center;
  justify-content: center;
  width: 100%;
  height: 100%;
  background-image: url('assets/images/load_screen.png');
  background-color: gray;
  background-repeat: no-repeat;
  background-attachment: fixed;
  background-position: center;
  background-size: contain;
  z-index: 9999;
}
The inner div with id "loader" is styled with a spin animation that continuously rotates the spinner.
-
#loader {
  border: 16px solid #3498db38;
  border-radius: 50%;
  border-top: 16px solid #3498db;
  width: 120px;
  height: 120px;
  -webkit-animation: spin 2s linear infinite;
  animation: spin 2s linear infinite;
  position: fixed;
}

@-webkit-keyframes spin {
  0% {
    -webkit-transform: rotate(0deg);
  }
  100% {
    -webkit-transform: rotate(360deg);
  }
}

@keyframes spin {
  0% {
    transform: rotate(0deg);
  }
  100% {
    transform: rotate(360deg);
  }
}
The result should look like this:
Step 3. Create the text to speech controls
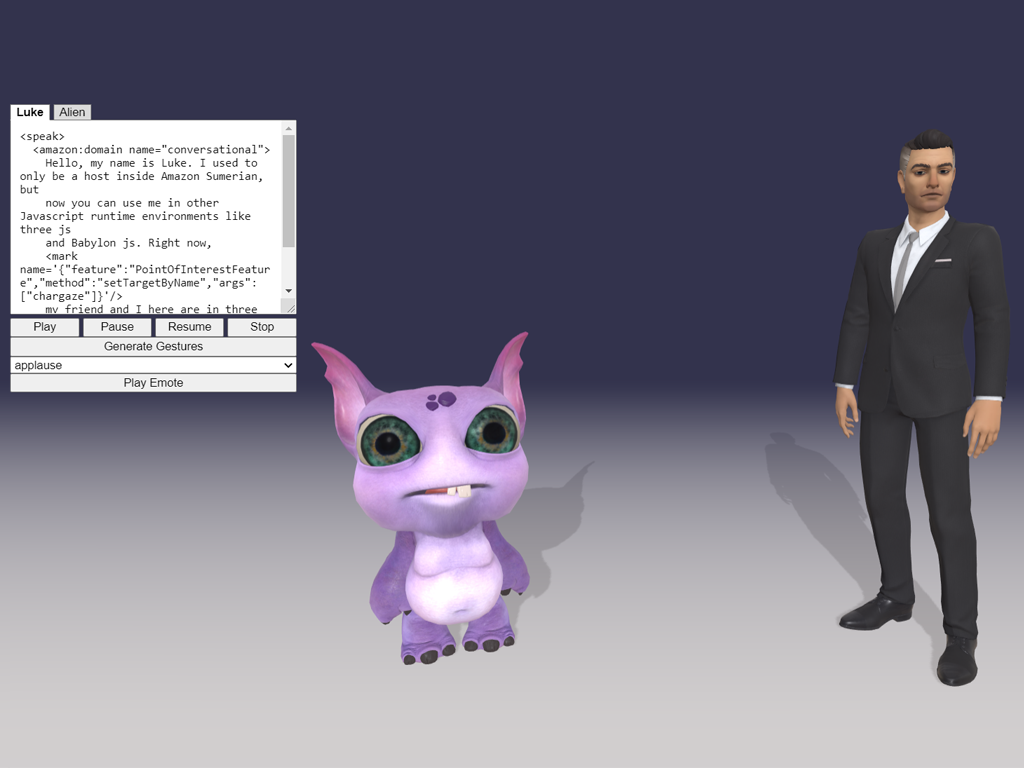
Our hosts will need some text input so we can tell them what to say, as well as some controls to play/pause/resume/stop the speech and execute emote animations. Take note of the id of each element, we'll be using these later. Note the use of the <amazon:domain name="conversational"> ssml tag. Use of this tag results in a more natural speaking style in the speech audio, but may not be available in all languages and voices. Check the Amazon Polly Feature and Region Compatibility.
<!--Text to speech controls-->
<div id="textToSpeech">
  <button class="tab current" onclick="toggleHost(event)">Luke</button>
  <button class="tab" onclick="toggleHost(event)">Alien</button>
  <div>
    <textarea autofocus size="23" type="text" class="textEntry Luke">
<speak>
  <amazon:domain name="conversational">
    Hello, my name is Luke. I used to only be a host inside Amazon Sumerian, but
    now you can use me in other Javascript runtime environments like three js. Right now,
    <mark name='{"feature":"PointOfInterestFeature","method":"setTargetByName","args":["chargaze"]}'/>
    my friend and I here are in three js.
  </amazon:domain>
</speak>
    </textarea>
    <textarea autofocus size="23" type="text" class="textEntry Alien">
<speak>
    Hi there! As you can see I'm set up to be a host too, although I don't use
    the same type of skeleton as any of the original Amazon Sumerian hosts. With
    open source hosts, you can apply host functionality to any custom animated
    character you'd like. I'm excited to see what kinds of interesting host
    characters you'll bring to life!
</speak>
    </textarea>
  </div>
  <div>
    <button id="play" class="speechButton">Play</button>
    <button id="pause" class="speechButton">Pause</button>
    <button id="resume" class="speechButton">Resume</button>
    <button id="stop" class="speechButton">Stop</button>
  </div>
  <div>
    <button id="gestures" class="gestureButton">Generate Gestures</button>
  </div>
  <div>
    <select id="emotes" class="gestureButton"></select>
  </div>
  <div>
    <button id="playEmote" class="gestureButton">Play Emote</button>
  </div>
</div>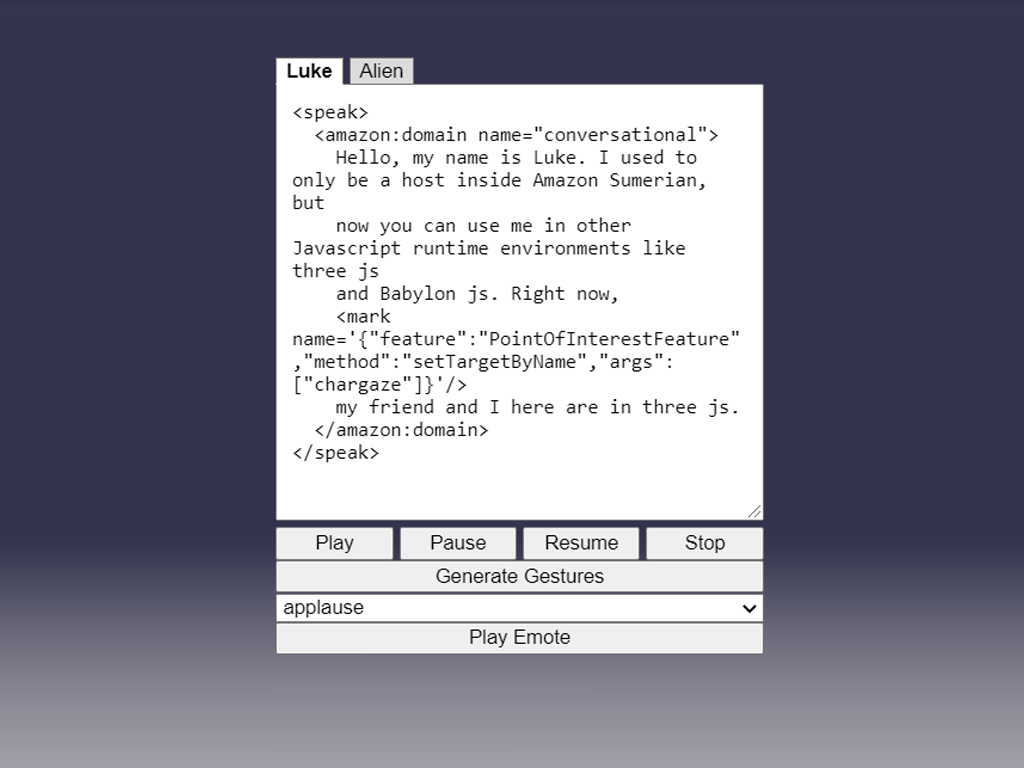
Now we will move onto the contents of the example script tag.
Step 4. Initialize global variables
three.js requires the user to manage the render loop. We'll define an array that will be used to collect functions that need to be executed during the render loop. In addition, we'll need a way to connect our UX elements to our host objects after they've been created, so we'll keep track of those here. Take note of the names, these match up with the names of the tab UX we created earlier. This is how we'll determine which host will respond when interacting with the UX elements. Next we'll take a look inside the function called main. This is where we'll set up our hosts and connect them to the UX.
const renderFn = [];
const speakers = new Map([
  ['Luke', undefined],
  ['Alien', undefined],
]);
Step 5. Configuring the AWS SDK
Our host will be using the TextToSpeechFeature, so before we can make the host speak we need to configure the AWS SDK with our region and credentials.
// Initialize AWS and create Polly service objects
window.AWS.config.region = 'us-west-2';
window.AWS.config.credentials = new AWS.CognitoIdentityCredentials({
  IdentityPoolId: '<Enter Cognito Identity Pool ID here>',
});
Replace <Enter Cognito Identity Pool ID here> with the id you created in the Prerequisites section. Make sure to set the region to the one you created your Cognito Identity Pool in. Using CognitoIdentityCredentials is just one example of how you can authenticate your host to access Polly. See the AWS SDK documentation to see other credentials classes you can use.
Step 6. Initializing the Host TextToSpeechFeature
The TextToSpeechFeature is the host feature that communicates with Amazon Polly to generate speech audio and speechmarks and plays them back at runtime. Before this feature can be used, it must be initialized with Polly and PollyPresigner instances, as well as the version of the AWS SDK being used.
const polly = new AWS.Polly();
const presigner = new AWS.Polly.Presigner();
const speechInit = HOST.aws.TextToSpeechFeature.initializeService(
  polly,
  presigner,
  window.AWS.VERSION
);
HOST.aws.TextToSpeechFeature.initializeService returns a promise that will resolve once the feature has successfully connected to Polly and populated its lists of available voices and languages. We'll store this as a variable so we can make sure it has resolved before allowing the user to send text to Polly.
Now we'll start setting up the visuals.
Step 7. Define asset variables
-
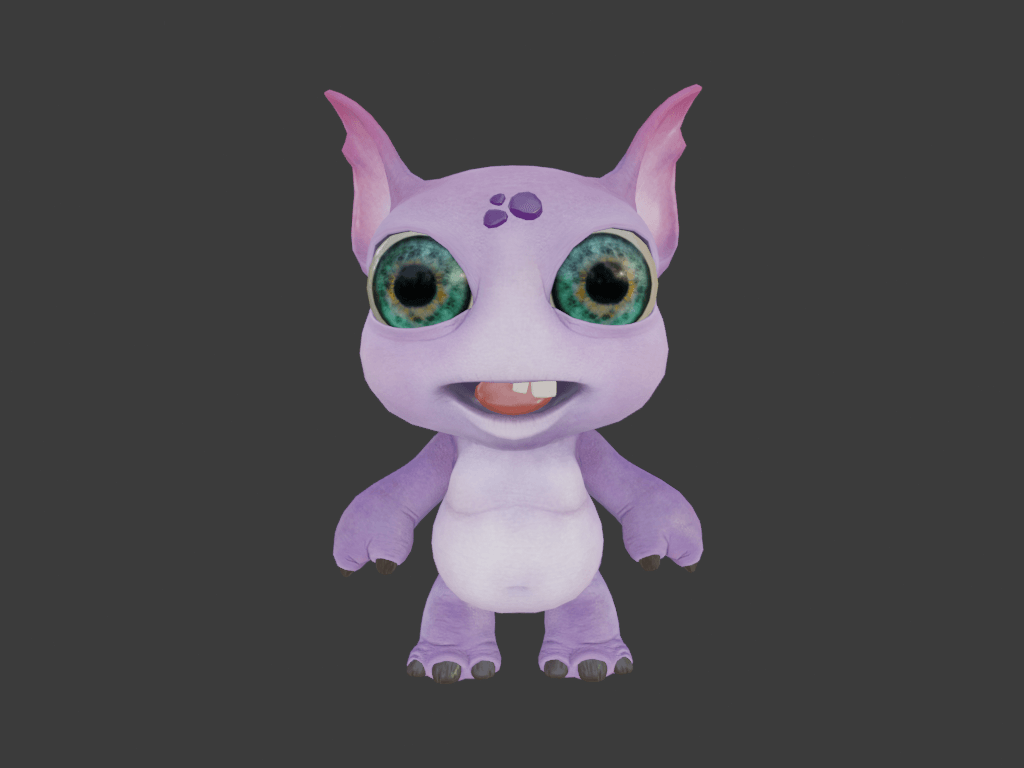
// Define the glTF assets that will represent the host
const characterFile1 =
  './assets/glTF/characters/adult_male/luke/luke.gltf';
const characterFile2 = './assets/glTF/characters/alien/alien.gltf';
const animationPath1 = './assets/glTF/animations/adult_male';
const animationPath2 = './assets/glTF/animations/alien';
const animationFiles = [
  'stand_idle.glb',
  'lipsync.glb',
  'gesture.glb',
  'emote.glb',
  'face_idle.glb',
  'blink.glb',
  'poi.glb',
];
const gestureConfigFile = 'gesture.json';
const poiConfigFile = 'poi.json';
For this example we'll be using the character glTF files called
luke.gltfandalien.gltf. Luke uses the adult_male character skeleton, so we'll use animation files from theadult_malefolder. Alien has a unique skeleton so we'll use the animations located in the folder matching its name.stand_idle.glbandlipsync.glbcontain all of the animations necessary to generate host lipsync animation at runtime.gesture.glbcontains gesture animations that can be triggered while the host is speaking to emphasize certain words and give some variety to the performance.emote.glbcontains a group of animations that take over the full body and face that can be useful to trigger as reactions to events.face_idle.glbcontains and ambient idle animation that can be played additively to add subtle movement to the host's face, making it appear more alive when the host is not speaking.blink.glbcontains several variations of the character's eyelids blinking, which we'll play periodically so our hosts' eyes don't dry out.poi.glbcontains a series of directional poses which, when blended together, will create the illusion that the host is looking at a specific object.The two JSON configuration files will be used to specify options that will be passed as arguments to the hosts' AnimationFeature when adding new animations. More on that later.
-
const audioAttachJoint1 = 'chardef_c_neckB'; // Name of the joint to attach audio to
const audioAttachJoint2 = 'charhead';
const lookJoint1 = 'charjx_c_look'; // Name of the joint to use for point of interest target tracking
const lookJoint2 = 'chargaze';
The Host TextToSpeechFeature supports passing in an object to attach the speech audio to. We want the speech to appear to come from the host's mouth, so this variable defines the name of a joint in the gltf asset that's located in the area of the character's head geometry. Note: If you import the glTF assets into a DCC tool like Blender, you'll see that there should by a
:after the sub-stringchar. Three.js removes this character from object names when you import which is why we haven't included them in the variables.The Host PointOfInterestFeature requires you to define an object that represents the direction the host character is looking. We've chosen a joint that is located directly between the character's eyes and points in the direction the eyes look during animations.
-
const voice1 = 'Matthew'; // Polly voice. Full list of available voices at: https://docs.aws.amazon.com/polly/latest/dg/voicelist.html
const voice2 = 'Ivy';
const voiceEngine = 'neural'; // Neural engine is not available for all voices in all regions: https://docs.aws.amazon.com/polly/latest/dg/NTTS-main.html
These variables define the Polly voices and engine we'll use when synthesizing speech audio. The neural engine tends to produce better results than the standard engine, however it is limited to certain voices and regions. See the Polly Documentation for more information about region and voice compatibility.
Step 8. Create a three.js scene and start the render loop
-
// Set up the scene and host
const {scene, camera, clock} = createScene();
Here is where we create the three.js scene and background environment. See the three.js documentation for detailed information on the components that make up a scene in three.js.
-
// Render loop
function render() {
  requestAnimationFrame(render);
  controls.update();

  renderFn.forEach(fn => {
    fn();
  });

  renderer.render(scene, camera);
}

render();
If we take a look inside the
createScenefunction, you'll see how we execute each function in therenderFnarray from Step 4. Later on we'll add the host's update function to that array so it can be updated each time the three.js renderer is updated.
Step 9. Load the glTF assets
const {
character: character1,
clips: clips1,
bindPoseOffset: bindPoseOffset1,
} = await loadCharacter(
scene,
characterFile1,
animationPath1,
animationFiles
);
const {
character: character2,
clips: clips2,
bindPoseOffset: bindPoseOffset2,
} = await loadCharacter(
scene,
characterFile2,
animationPath2,
animationFiles
);
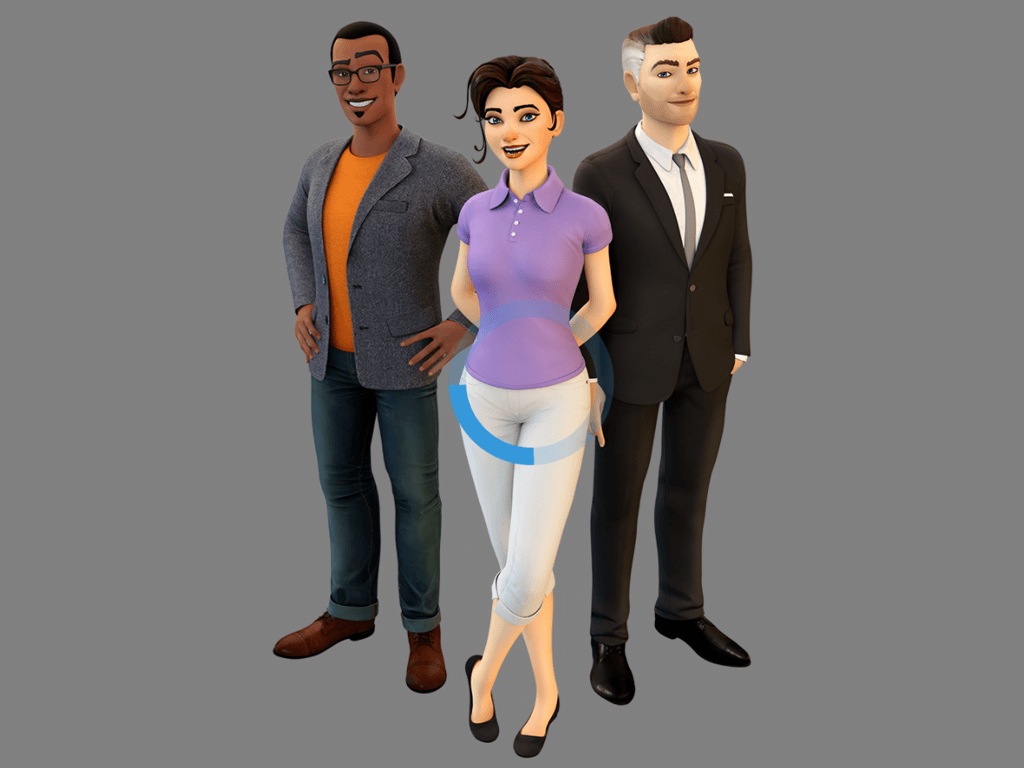
character1.position.set(1.25, 0, 0);
character1.rotateY(-0.5);
character2.position.set(-0.5, 0, 0);
character2.rotateY(0.5);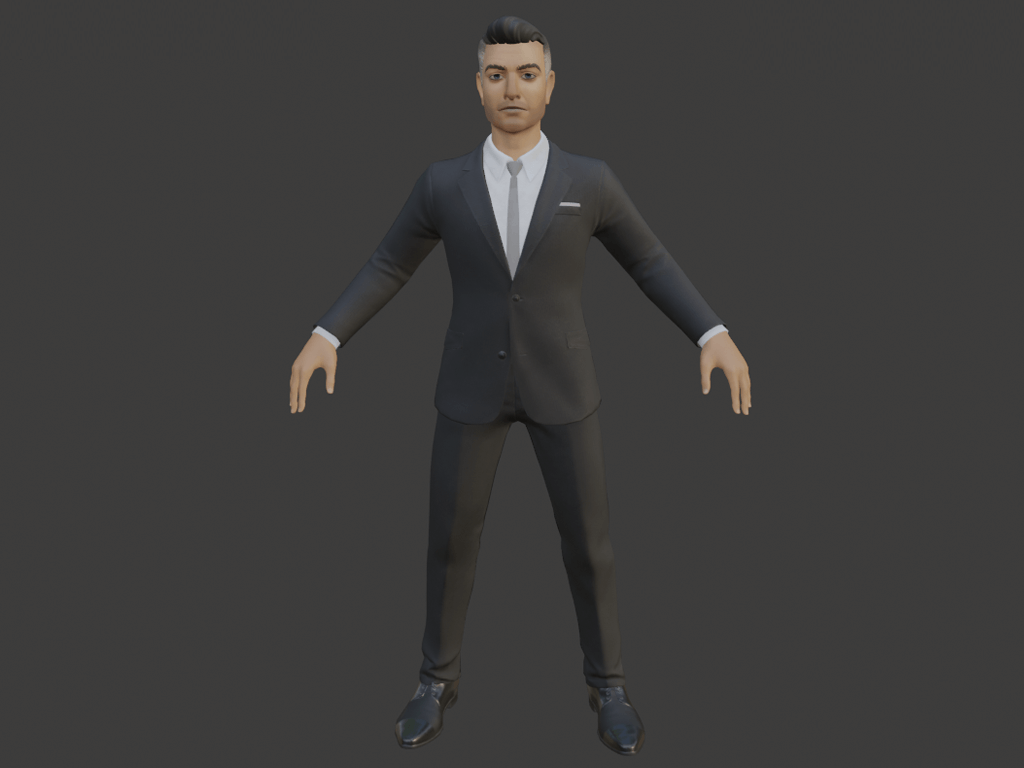
Here is where we load the glTF assets we defined in Step 7. loadCharacter is an asynchronous function that uses the three.js GLTFLoader to load glTF asset as three.js objects and add them to the scene. See the three.js documentation for more detailed information on loading glTF assets. Once the assets are loaded, we adjust their positions and rotations so they are standing next to and slightly facing each other.
// Find the joints defined by name
const audioAttach1 = character1.getObjectByName(audioAttachJoint1);
const audioAttach2 = character2.getObjectByName(audioAttachJoint2);
const lookTracker1 = character1.getObjectByName(lookJoint1);
const lookTracker2 = character2.getObjectByName(lookJoint2);
Now that the characters are loaded, we can search the character object hierarchies for the joints matching the names we defined.
// Read the gesture config file. This file contains options for splitting up
// each animation in gestures.glb into 3 sub-animations and initializing them
// as a QueueState animation.
const gestureConfig1 = await fetch(
  `${animationPath1}/${gestureConfigFile}`
).then(response => response.json());
const gestureConfig2 = await fetch(
  `${animationPath2}/${gestureConfigFile}`
).then(response => response.json());
The gestureConfigFile is also being loaded here. This file is a JSON file that contains the information necessary to take each animation in gesture.glb and split it into 3 parts: a transition motion from the standing idle pose into the main posture of the gesture, a looping motion in the gesture posture, and a transition motion from the gesture posture back to the standing idle pose. Having a looping motion in the gesture allows us to take advantage of the holdTime functionality in the GestureFeature.
// Read the point of interest config file. This file contains options for
// creating Blend2dStates from look pose clips and initializing look layers
// on the PointOfInterestFeature.
const poiConfig1 = await fetch(
  `${animationPath1}/${poiConfigFile}`
).then(response => response.json());
const poiConfig2 = await fetch(
  `${animationPath2}/${poiConfigFile}`
).then(response => response.json());
Finally the poiConfigFile gets loaded. This file has two purposes. First, it tells the AnimationFeature how to configure the animation states and layers associated with the animation clips imported from poi.glb. In addition, it tells the PointOfInterestFeature the information it needs to know about each animation layer it will own.
Step 10. Initializing the Hosts
const [
  idleClips1,
  lipsyncClips1,
  gestureClips1,
  emoteClips1,
  faceClips1,
  blinkClips1,
  poiClips1,
] = clips1;
const host1 = createHost(
  character1,
  audioAttach1,
  voice1,
  voiceEngine,
  idleClips1[0],
  faceClips1[0],
  lipsyncClips1,
  gestureClips1,
  gestureConfig1,
  emoteClips1,
  blinkClips1,
  poiClips1,
  poiConfig1,
  lookTracker1,
  bindPoseOffset1,
  clock,
  camera,
  scene
);
const [
  idleClips2,
  lipsyncClips2,
  gestureClips2,
  emoteClips2,
  faceClips2,
  blinkClips2,
  poiClips2,
] = clips2;
const host2 = createHost(
  character2,
  audioAttach2,
  voice2,
  voiceEngine,
  idleClips2[0],
  faceClips2[0],
  lipsyncClips2,
  gestureClips2,
  gestureConfig2,
  emoteClips2,
  blinkClips2,
  poiClips2,
  poiConfig2,
  lookTracker2,
  bindPoseOffset2,
  clock,
  camera,
  scene
);
Here we pass all of our assets and variables to the createHost function. This function is where we'll create the HostObject and add features to it. Next we'll inspect what makes up the createHost function.
-
// Add the host to the render loop
const host = new HOST.HostObject({owner: character, clock});
renderFn.push(() => {
  host.update();
});
We pass the character asset we loaded earlier and the three.js clock object to the
HostObjectconstructor so that the host system can keep track of the asset it's manipulating and can stay in sync with the three.js clock. The clock parameter is optional but it's recommended that you pass a clock for better accuracy. This is also where we add the host'supdatefunction to the render loop so it will start animating. -
// Set up text to speech
const audioListener = new THREE.AudioListener();
camera.add(audioListener);
host.addFeature(HOST.aws.TextToSpeechFeature, false, {
  listener: audioListener,
  attachTo: audioAttachJoint,
  voice,
  engine,
});
Here is where we add the TextToSpeechFeature to allow the host to convert text to audio and play it back. The TextToSpeechFeature will emit messages during playback events like play/pause/resume/stop as well as when speechmarks are encountered during the audio. three.js Hosts use the three.js audio system, so we need to pass it and AudioListener. The host will use three.js PositionalAudio attached to the joint in the head we found earlier when it synthesizes speech audio if we define it as the
attachToinput parameter. -
// Set up animation
host.addFeature(HOST.anim.AnimationFeature);
Next we add the AnimationFeature. This is what allows you to manage and play animations on the host character asset. The AnimationFeature is a layered animation system, below we'll take a look at each animation layer and animations we'll add to make the host appear to speak, gesture and look at the camera.
-
// Base idle
host.AnimationFeature.addLayer('Base');
host.AnimationFeature.addAnimation(
  'Base',
  idleClip.name,
  HOST.anim.AnimationTypes.single,
  {clip: idleClip}
);
host.AnimationFeature.playAnimation('Base', idleClip.name);
Here we have added a single AnimationLayer to the host. Animation layers are containers that manage playback of a subset of animations. Each AnimationLayer can only play a single animation at any given time, but a host animation can also be a container for multiple animation assets. Here we are creating an animation of type
HOST.anim.AnimationTypes.single, which means that the animation can only contain one three.js AnimationClip. The clip we've chosen is thestand_idleanimation, which contains looping ambient motion in a standing position. This is the animation you'll see by default when the host isn't speaking.host.AnimationFeature.playAnimationis telling the host to start playing the idle animation on theBaselayer we just created. -
// Face idle
host.AnimationFeature.addLayer('Face', {
  blendMode: HOST.anim.LayerBlendModes.Additive,
});
THREE.AnimationUtils.makeClipAdditive(faceIdleClip);
host.AnimationFeature.addAnimation(
  'Face',
  faceIdleClip.name,
  HOST.anim.AnimationTypes.single,
  {
    clip: THREE.AnimationUtils.subclip(
      faceIdleClip,
      faceIdleClip.name,
      1,
      faceIdleClip.duration * 30,
      30
    ),
  }
);
host.AnimationFeature.playAnimation('Face', faceIdleClip.name);
The next animation layer we'll add will contain another looping idle that ambient motion in the face to help the host appear more lifelike when nothing else is going on. You'll notice that we've included an options object this time when executing
AnimationFeature.addLayer.blendModedefines the type of blending that will be used when playing animations on this layer in combination with the other layers on the host. The default isOverride, which means that animation on the layer would cancel out animations on layers underneath, but here we have defined the layer asAdditive. This means that the animations on this layer will add on top of the animations on the layer namedBase.THREE.AnimationUtils.makeClipAdditivetells the three.js rendering engine to take the transformations of joints in the clip at frame 0 and subtract them out of the transformations on the rest of the frames. This conversion makes it possible to use the clip on anAdditivelayer without affecting the proportions of the character rig. -
// Blink
host.AnimationFeature.addLayer('Blink', {
  blendMode: HOST.anim.LayerBlendModes.Additive,
  transitionTime: 0.075,
});
blinkClips.forEach(clip => {
  THREE.AnimationUtils.makeClipAdditive(clip);
});
host.AnimationFeature.addAnimation(
  'Blink',
  'blink',
  HOST.anim.AnimationTypes.randomAnimation,
  {
    playInterval: 3,
    subStateOptions: blinkClips.map(clip => {
      return {
        name: clip.name,
        loopCount: 1,
        clip,
      };
    }),
  }
);
host.AnimationFeature.playAnimation('Blink', 'blink');
The next animation layer we'll add will contain the host's blinking behavior. It will be an
Additivelayer again, so first we'll convert the blink clips to additive format. The layer will contain a single animation with the type calledrandomAnimation. This type of animation will periodically choose a random animation from a list of sub-animations and play it.playIntervaldefines the average number of seconds that will elapse before a new animation is chosen. This allows us to continuously trigger blink animations without manually calling play each time. -
// Talking idle
host.AnimationFeature.addLayer('Talk', {
  transitionTime: 0.75,
  blendMode: HOST.anim.LayerBlendModes.Additive,
});
host.AnimationFeature.setLayerWeight('Talk', 0);
const talkClip = lipsyncClips.find(c => c.name === 'stand_talk');
lipsyncClips.splice(lipsyncClips.indexOf(talkClip), 1);
host.AnimationFeature.addAnimation(
  'Talk',
  talkClip.name,
  HOST.anim.AnimationTypes.single,
  {clip: THREE.AnimationUtils.makeClipAdditive(talkClip)}
);
host.AnimationFeature.playAnimation('Talk', talkClip.name);
Next we'll add a layer with another looping idle that contains a full body motion in the standing position to simulate the type of ambient gestures people make when they talk. This time we passed in a
transitionTimevariable, which defines the default amount of time it takes to blend to a new animation on the layer. We've definedblendModeasAdditiveagain, so the results from this layer will add on top of the results from the previous layers. AnimationFeature.setLayerWeight tells the host that we don't want animations on this layer to have any influence by default. Layers can have weight values ranging from 0-1. -
// Gesture animations
host.AnimationFeature.addLayer('Gesture', {
  transitionTime: 0.5,
  blendMode: HOST.anim.LayerBlendModes.Additive,
});
gestureClips.forEach(clip => {
  const {name} = clip;
  const config = gestureConfig[name];
  THREE.AnimationUtils.makeClipAdditive(clip);

  if (config !== undefined) {
    config.queueOptions.forEach((option, index) => {
      // Create a subclip for each range in queueOptions
      option.clip = THREE.AnimationUtils.subclip(
        clip,
        `${name}_${option.name}`,
        option.from,
        option.to,
        30
      );
    });
    host.AnimationFeature.addAnimation(
      'Gesture',
      name,
      HOST.anim.AnimationTypes.queue,
      config
    );
  } else {
    host.AnimationFeature.addAnimation(
      'Gesture',
      name,
      HOST.anim.AnimationTypes.single,
      {clip}
    );
  }
});
Next we create the animations that will allow the host to perform gestures in time with ssml tags emitted from the TextToSpeechFeature. This is where the gestureConfigFile we loaded earlier becomes useful. The gestureConfig object is used to split each gesture into sub-clips using to and from frame ranges defined in the config. Instead of creating a single animation for each clip, we will use a queue type animation. This type of animation allows you to define an array of clips to be played in order. The queue will automatically advance once the currently playing clip stops.
-
// Emote animations
host.AnimationFeature.addLayer('Emote', {
  transitionTime: 0.5,
});

emoteClips.forEach(clip => {
  const {name} = clip;
  host.AnimationFeature.addAnimation(
    'Emote',
    name,
    HOST.anim.AnimationTypes.single,
    {clip, loopCount: 1}
  );
});
Next we create the animations that can be used as full body and face reactions. We use an Override layer here because we want these reactions to replace any gesture or talking idle animations that may be in progress when these animations are triggered.
-
// Viseme poses
host.AnimationFeature.addLayer('Viseme', {
  transitionTime: 0.12,
  blendMode: HOST.anim.LayerBlendModes.Additive,
});
host.AnimationFeature.setLayerWeight('Viseme', 0);

// Slice off the reference frame
const blendStateOptions = lipsyncClips.map(clip => {
  THREE.AnimationUtils.makeClipAdditive(clip);
  return {
    name: clip.name,
    clip: THREE.AnimationUtils.subclip(clip, clip.name, 1, 2, 30),
    weight: 0,
  };
});
host.AnimationFeature.addAnimation(
  'Viseme',
  'visemes',
  HOST.anim.AnimationTypes.freeBlend,
  {blendStateOptions}
);
host.AnimationFeature.playAnimation('Viseme', 'visemes');
Next we create an animation that will control the lipsync animation for the host. Lipsync is achieved by blending a series of poses that correspond to viseme speechmarks that the TextToSpeechFeature emits. See the Polly documentation to find out more about the visemes that Polly generates.
You'll notice a difference here when we add the animation to the layer - we're using a different animation type called freeBlend. This type of animation allows you to blend between N-number of three.js AnimationClips at the same time. Each clip gets its own weight, if the cumulative weight of all of the clips in the animation container exceed 1 then they are normalized. As the host performs lipsync animation, it will manipulate these blend weights behind the scenes as viseme speechmarks are encountered to shape the host's mouth to match the sounds it is making.
We're also using THREE.AnimationUtils.subclip to remove frame 0 from the clips controlled by the freeBlend animation. This is because the initial frame of each viseme pose animation is the reference frame we used inside loadCharacter in order to convert the keyframes to be additive, meaning that every keyframe after 0 is relative to the pose at frame 0. We no longer need this part of the animation so it gets sliced off before sending the clip to host.AnimationFeature.addAnimation.
-
// POI poses
poiConfig.forEach(config => {
  host.AnimationFeature.addLayer(config.name, {
    blendMode: HOST.anim.LayerBlendModes.Additive,
  });

  // Find each pose clip and make it additive
  config.blendStateOptions.forEach(clipConfig => {
    const clip = poiClips.find(clip => clip.name === clipConfig.clip);
    THREE.AnimationUtils.makeClipAdditive(clip);
    clipConfig.clip = THREE.AnimationUtils.subclip(
      clip,
      clip.name,
      1,
      2,
      30
    );
  });

  host.AnimationFeature.addAnimation(
    config.name,
    config.animation,
    HOST.anim.AnimationTypes.blend2d,
    {...config}
  );

  host.AnimationFeature.playAnimation(config.name, config.animation);

  // Find and store reference objects
  config.reference = character.getObjectByName(
    config.reference.replace(':', '')
  );
});
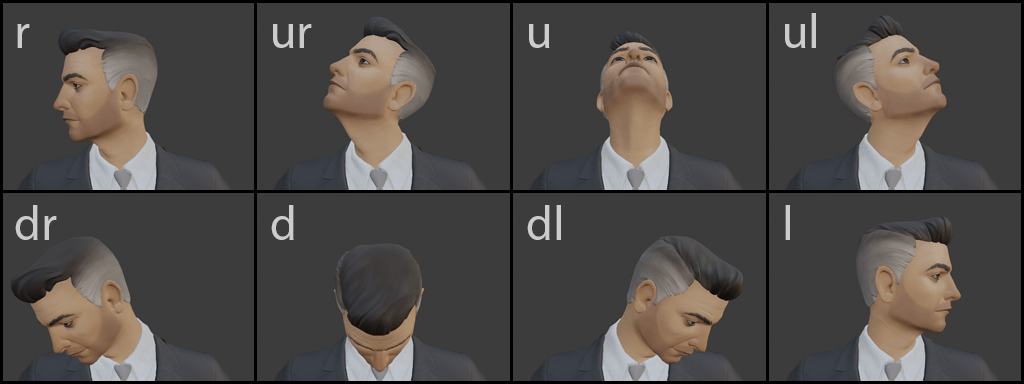
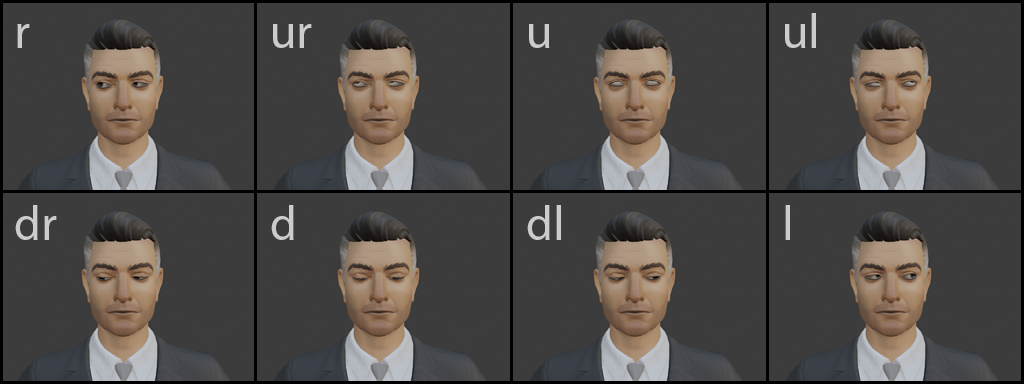
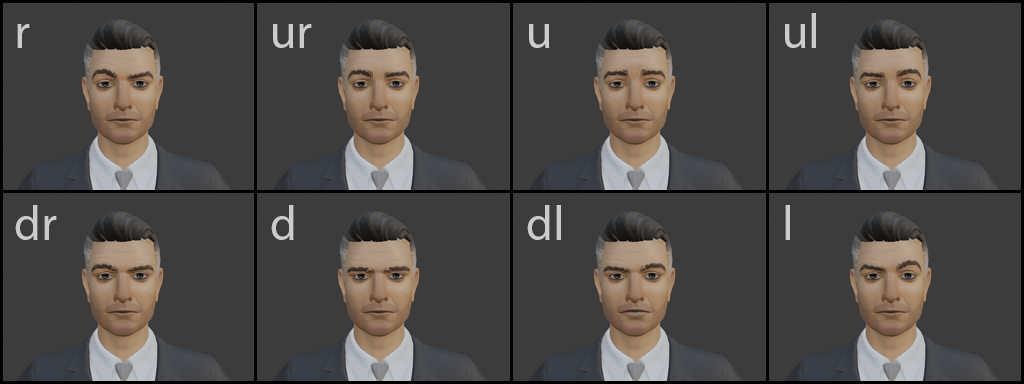
Next we create the animations that will allow the host to appear to look at/focus on a target object. This is achieved by blending a series of directional poses representing horizontal and vertical rotation in each direction. If you look back in the poiConfigFile, you'll notice that we have split these animations up into three categories - head, eye and eyebrow. The reason we have separated these is so that we can tell the PointOfInterestFeature to control each one at a different speed, allowing us to achieve the effect of the eyes leading the head.
We're using a different animation type here called blend2d. This type of animation allows you to associate animation clips with X and Y blend values. As these blend values are manipulated, the animation will blend between the clips whose associated X and Y values are in the range of the current values. We have defined our X and Y thresholds for each clip to equal the horizontal and vertical angles in degrees the look joint we defined earlier is rotated relative to the reference object defined for the layer in the poiConfigFile during the animation.
-
// Apply bindPoseOffset clip if it exists
if (bindPoseOffset !== undefined) {
  host.AnimationFeature.addLayer('BindPoseOffset', {
    blendMode: HOST.anim.LayerBlendModes.Additive,
  });
  host.AnimationFeature.addAnimation(
    'BindPoseOffset',
    bindPoseOffset.name,
    HOST.anim.AnimationTypes.single,
    {
      clip: THREE.AnimationUtils.subclip(
        bindPoseOffset,
        bindPoseOffset.name,
        1,
        2,
        30
      ),
    }
  );
  host.AnimationFeature.playAnimation(
    'BindPoseOffset',
    bindPoseOffset.name
  );
}
The last animation layer we'll add is optional, it is not needed for all of the provided host glTF character assets. All of the host assets in the assets/glTF/characters/adult_male folder share a common body skeleton, as do the assets in the assets/glTF/characters/adult_female folder. However each host character asset has unique facial joint placement. All of the animations in the adult_male folder were exported from the character skeleton in wes.glTF, and all of those in the adult_female folder were exported from the character skeleton in fiona.glTF. To make sharing animations within the same character classification possible, each of the other host glTF character assets include an animation clip containing 2 poses called bindpose_offset. The first pose in this animation keyframes the joints in the position the wes.glTF or fiona.glTF meshes were bound to their skeletons at, depending on which folder the asset is located in. The second pose keyframes the joints in the pose the character’s meshes were bound to its own skeleton at. When the clip is made additive, the first pose is subtracted out of the second one, creating an offset that can be played on top of the other animations to correct the facial joints back to the starting position unique to the character asset. The alien asset does not contain this animation and layer because it has its own unique set of animations.
-
// Set up Lipsync
const visemeOptions = {
  layers: [{name: 'Viseme', animation: 'visemes'}],
};
const talkingOptions = {
  layers: [
    {
      name: 'Talk',
      animation: 'stand_talk',
      blendTime: 0.75,
      easingFn: HOST.anim.Easing.Quadratic.InOut,
    },
  ],
};
host.addFeature(
  HOST.LipsyncFeature,
  false,
  visemeOptions,
  talkingOptions
);
Next we add the LipsyncFeature. This is the feature that listens to the TextToSpeechFeature and manipulates animations in the AnimationFeature as speechmark messages are caught from the TextToSpeechFeature. This feature will have no effect until both of the prerequisite features have been added to the host.
The
visemeOptionsobject tells the LipsyncFeature that we have one layer on the AnimationFeature that contains viseme-related animations, its name isVisemeand the freeBlend animation that contains the viseme poses is calledviseme. The LipsyncFeature requires that the animation defined forvisemeOptionsis of typefreeBlend, if it is not then lipsync animation will have no effect. Each layer defined invisemeOptionscan optionally define avisemeMapobject that maps the names of Polly visemes to options such as the name of the corresponding animation blend weight. In the provided host objects we have named all of the viseme animations to match the Polly visemes so we don't need to provide this object. See DefaultVisemeMap to see the required format if you define your ownvisemeMap. As the LipsyncFeature catches viseme events from the TextToSpeechFeature, it will look for the animation blend weight name defined in thevisemeMapthat corresponds with the name of the viseme speechmark. If it finds one it will blend its weight toward 1 and then back to zero over the duration of the viseme speechmark to simulate speech.The
talkingOptionsobject tells the LipsyncFeature that we have one layer on the AnimationFeature that contains ambient talking motion, its name isTalkand the animation we want to play on that layer while speech audio is playing is calledstand_talk.When the LipsyncFeature catches play and resume speech events from the TextToSpeechFeature, it will blend the weight of any viseme or talking layers defined in
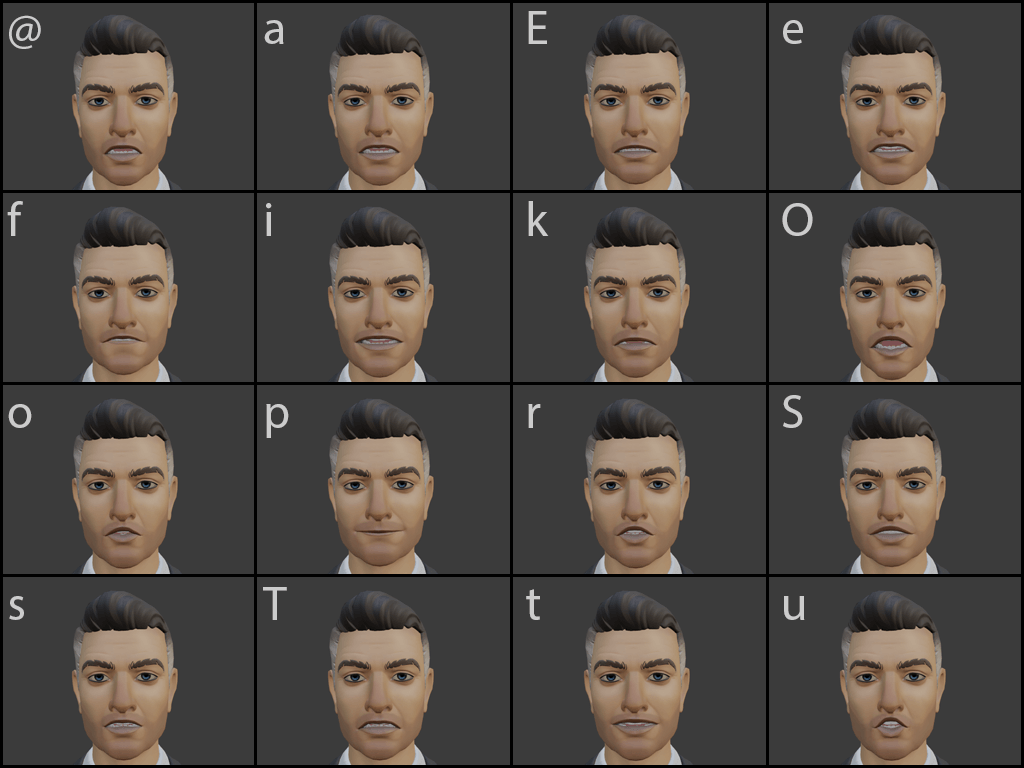
visemeOptionsandtalkingOptionsto 1 and play the animation defined for the layer. When it catches pause or stop events it will blend the weights back to 0. TheblendTimeandeasingFninputs define how long that transition will take and the type of blending function that will be used.Here's a look at each of the viseme poses. There is also an additional pose called 'sil', which is just the default neutral pose.
-
// Set up Gestures
host.addFeature(HOST.GestureFeature, false, {
  layers: {
    Gesture: {minimumInterval: 3},
    Emote: {
      blendTime: 0.5,
      easingFn: HOST.anim.Easing.Quadratic.InOut,
    },
  },
});
Next we add the GestureFeature. This is the feature that will control the
queueanimations we created earlier, as well as the emote reaction animations. Thelayerinput parameter allows you to define the names of animation layers that the feature is able to manipulate. Each layer name is associated with a gesture options object specific to that layer. TheminimumIntervaloption allows you to define the minimum amount of time in seconds that must elapse after each call to GestureFeature.playGesture before another gesture can be played. Set this option to 0 if you don't want any limitations on playing gestures. Raising this option above 0 will give better looking results when auto-generating ssml markup for gestures. Another option that can be defined isholdTime. Remember that we defined our gesture animations asqueueanimations, and that the second animation in each queue was set to loop infinitely. Because of this, the queue can never progress to its final animation on its own. The GestureFeature listens for when the AnimationFeature emits itsplayNextAnimationmessage. This message is emitted each time aqueueanimation progresses. If the GestureFeature detects that the new current animation in the queue cannot progress, it will start a timer that expires after the number of seconds defined byholdTimeelapses. Once that happens, it will progress the queue. We'll leave it at the default value of 3 for this example. -
// Set up Point of Interest
host.addFeature(
  HOST.PointOfInterestFeature,
  false,
  {
    target: camera,
    lookTracker: lookJoint,
    scene,
  },
  {
    layers: poiConfig,
  },
  {
    layers: [{name: 'Blink'}],
  }
);
Finally we add the PointOfInterestFeature. This is the feature that will control the
blend2danimations we created earlier, as well as the blink animations.The
targetinput is optional, it defines the object the host will try to look at. When no target is defined, only small saccadic movements will be periodically applied for the layers whose options havehasSaccadeset totrue(seepoiConfigFile).The
lookTrackerobject is mandatory, it defines the joint in the host's skeleton that will be used to calculate the blend values necessary to make the host look at the target. This joint should be rotated by the amounts specified in theblendThresholdsin each clip in theblend2danimations.Supplying a
sceneobject to the feature allows us to use thesetTargetByNamefunctionality to switch the target object. We've used this syntax in the default text in the textarea associated with the Luke host.We pass in our
poiConfigobject to the look layer configuration to tell the feature which layers and animations will be driven by calculated look angles. Although it is optional, we also pass in our blink layer and animation. This allows thePointOfInterestFeatureto trigger blink animations when the target moves a large amount over a short period of time.Head
Eyes
Eyebrows
We have now added all of the host features necessary to simulate animated speech with body gestures and object tracking. Next we'll jump back up to the main function to finish finalizing the scene.
Step 11. Add speech listeners
// Set up each host to look at the other when the other speaks and at the
// camera when speech ends
const onHost1StartSpeech = () => {
  host2.PointOfInterestFeature.setTarget(lookTracker1);
};
const onHost2StartSpeech = () => {
  host1.PointOfInterestFeature.setTarget(lookTracker2);
};
const onStopSpeech = () => {
  host1.PointOfInterestFeature.setTarget(camera);
  host2.PointOfInterestFeature.setTarget(camera);
};

host1.listenTo(
  host1.TextToSpeechFeature.EVENTS.play,
  onHost1StartSpeech
);
host1.listenTo(
  host1.TextToSpeechFeature.EVENTS.resume,
  onHost1StartSpeech
);
host2.listenTo(
  host2.TextToSpeechFeature.EVENTS.play,
  onHost2StartSpeech
);
host2.listenTo(
  host2.TextToSpeechFeature.EVENTS.resume,
  onHost2StartSpeech
);
HOST.aws.TextToSpeechFeature.listenTo(
  HOST.aws.TextToSpeechFeature.EVENTS.pause,
  onStopSpeech
);
HOST.aws.TextToSpeechFeature.listenTo(
  HOST.aws.TextToSpeechFeature.EVENTS.stop,
  onStopSpeech
);
Each time one host speaks, we'll make the other host look at them to make it appear that they are paying attention to what is being said. To do this, we will listen to the events emitted from the TextToSpeechFeature when speeches are played, paused, resumed and stopped. For play and resume we want to know which host started speaking so the other can look at it, so we'll listen to the host instance objects. For pause and stop we don't care which host stopped because they'll look at the camera either way, so we'll listen to the TextToSpeechFeature class instead. When the events are caught, we execute PointOfInterestFeature.setTarget to change the object the host is looking at.
Step 12. Hide the load screen
// Hide the load screen and show the text input
document.getElementById('textToSpeech').style.display = 'inline-block';
document.getElementById('loadScreen').style.display = 'none';
All of the visuals for the hosts have been set up and we have begun playing back animation, so now is a good time to hide the load screen to begin showing the rendered results. We'll find and hide the loadScreen div and show the textToSpeech div.
Step 13. Initialize the speech controls
await speechInit;

speakers.set('Luke', host1);
speakers.set('Alien', host2);

initializeUX();
First we need to wait for the TextToSpeechFeature to finish being initialized. It has likely already finished at this point but we add await speechInit just in case the glTF assets were very quick to load.
We also need to add the host instance objects to our speaker object so they can be used inside initializeUX. We'll jump inside that function now to see how to connect those instances to the speech buttons.
// Enable drag/drop text files on the speech text area
enableDragDrop('textEntry');

// Play, pause, resume and stop the contents of the text input as speech
// when buttons are clicked
['play', 'pause', 'resume', 'stop'].forEach(id => {
  const button = document.getElementById(id);
  button.onclick = () => {
    const {name, host} = getCurrentHost(speakers);
    const speechInput = document.getElementsByClassName(
      `textEntry ${name}`
    )[0];
    host.TextToSpeechFeature[id](speechInput.value);
  };
});
Our example will include textareas that you can use to input the text that you'd like your hosts to recite. enableDragDrop copies the contents of a text file into the textarea when you drag and drop a text file onto the textarea. This makes it easy to try out lots of different text.
Then we loop through our playback control buttons and add onclick callbacks to execute play/pause/resume/stop methods on the TextToSpeechFeature. We'll pass them the value of the textarea so that the host knows what to say. The getCurrentHost function will determine name and instance of the host whose methods should be called based on which tab is showing in the UX.
Step 14. Add the ability to auto-generate SSML markup to play gestures
// Update the text area text with gesture SSML markup when clicked
const gestureButton = document.getElementById('gestures');
gestureButton.onclick = () => {
  const {name, host} = getCurrentHost(speakers);
  const speechInput = document.getElementsByClassName(
    `textEntry ${name}`
  )[0];
  const gestureMap = host.GestureFeature.createGestureMap();
  const gestureArray = host.GestureFeature.createGenericGestureArray([
    'Gesture',
  ]);
  speechInput.value = HOST.aws.TextToSpeechUtils.autoGenerateSSMLMarks(
    speechInput.value,
    gestureMap,
    gestureArray
  );
};
TextToSpeechUtils.autoGenerateSSMLMarks is a method that allows you to define a speech string and an object that maps SSML mark strings to arrays of words. If words in the arrays are encountered in the speech string, an SSML mark tag is inserted with the value of the mark string prior to the word in the string and the resulting string is returned. Gestures can be triggered from mark tags by using the following syntax for the mark string: {"feature":"GestureFeature", "method":"playGesture", "args":["<name of gesture layer goes here>", "<name of gesture animation goes here>"], {"holdTime":<optional holdTime value goes here>, "minimumInterval":<optional minimumInterval value goes here}}.
When an SSML speechmark is received by the GestureFeature, this syntax tells it that the feature type it applies to is the GestureFeature, the method to be executed is playGesture and the arguments that should be passed are in the args array. To make it easier to create an object that maps this type of syntax to word arrays, the Gesture feature includes a createGestureMap method to generate an object based on the gestures animations that have been registered.
Remember that we passed an options object with a layers property when we created the GestureFeature. Each layer object can contain an animations property corresponding to an object that maps animation names to animations options objects. Each animation options object can contain a words array representing an array of strings that the autoGenerateSSMLMarks will search for when trying to insert markup for that gesture.
By default every animation on a layer is registered, even if you don't define options for it. If a gesture animation is registered without options, it will try to use an array defined for its name in the DefaultGestureWords object if one exists. Because the animation names used in the sample gesture.glb files are present in the DefaultGestureWords, we didn't need to define anything extra when we created the feature.
We add an onclick callback to the gestures button to update the text in the textarea with SSML markup to trigger the host gesture animations.
Step 15. Add the ability to play emotes
// Play emote on demand with emote button
const emoteSelect = document.getElementById('emotes');
const emoteButton = document.getElementById('playEmote');
emoteButton.onclick = () => {
  const {host} = getCurrentHost(speakers);
  host.GestureFeature.playGesture('Emote', emoteSelect.value);
};
We add an onclick callback to the emote button to play whichever animation name is current in the selector.
Step 16. Initialize the host tab UX
// Initialize tab
const tab = document.getElementsByClassName('tab current')[0];
toggleHost({target: tab});
Finally we will set up the functionality for updating the UX elements based on which host tab is current. We'll jump inside the toggleHost function to see how this works.
const tab = evt.target;
const allTabs = document.getElementsByClassName('tab');

// Update tab classes
for (let i = 0, l = allTabs.length; i < l; i++) {
  if (allTabs[i] !== tab) {
    allTabs[i].classList.remove('current');
  } else {
    allTabs[i].classList.add('current');
  }
}

// Show/hide speech input classes
const {name, host} = getCurrentHost(speakers);
const textEntries = document.getElementsByClassName('textEntry');

for (let i = 0, l = textEntries.length; i < l; i += 1) {
  const textEntry = textEntries[i];

  if (textEntry.classList.contains(name)) {
    textEntry.classList.remove('hidden');
  } else {
    textEntry.classList.add('hidden');
  }
}
When a host tab is clicked on, we need to add the current class to the clicked tab so we know that is the currently active host. We remove that class from the other host.
We also remove the hidden class from the clicked tab so that its associated textarea will be visible. We add that class to the other textarea to hide it.
// Update emote selector
const emoteSelect = document.getElementById('emotes');
emoteSelect.length = 0;
const emotes = host.AnimationFeature.getAnimations('Emote');
emotes.forEach((emote, i) => {
  const emoteOption = document.createElement('option');
  emoteOption.text = emote;
  emoteOption.value = emote;
  emoteSelect.add(emoteOption, 0);

  // Set the current item to the first emote
  if (!i) {
    emoteSelect.value = emote;
  }
});
Here we will populate the empty emote selector we created earlier with the names of the animations we added to the Emote animation layer. AnimationFeature.getAnimations returns a list of strings representing the names of animations owned by an AnimationLayer, we'll add each of these names as a new option in the selector.
You've now created everything necessary to load host glTF assets into the three.js rendering engine and animate them along with audio generated in Amazon Polly. The finished script (minus the Cognito Identity Pool ID) can be found in the amazon-sumerian-hosts/examples/ directory. Run the script on a web server and give it a try. For information on how to run things locally, see the three.js documentation.
Step 17. Next Steps
Now that you've demonstrated your hosts running locally, consider publishing them to the web via one of these related tutorials: