fenster
fenster for React Native is a simple way to view and develop your components in isolation. Compared to storybook, fenster doesn't use a second bundler and also doesn't expose another app. Instead fenster is a part of your app and simply uses the metro bundler, which already bundles your app. No worries, fenster won't be included in production builds.
fenster stores which component you're currently viewing, so even if you reload the app to see changes, it won't lose its state.
Table of Contents
Background
Fenster, das
n – /ˈfɛnstɐ/ – german for "window"
fenster is a window into your app.
Viewing screens without navigating through your app is essential for fast and comfortable development. React Native's hot module reloading isn't 100% reliable, you don't want to navigate through your app all over again after reloading the app.
Maybe you too temporarily changed the initial screen of your app, just to fix some styling. And that's basically what fenster does: when active, fenster renders a single component instead of the whole app.
Install
npm install fensterSetup
Wrap your whole app inside FensterRahmen and pass an array of components,
which fenster should display.
Component { return <FensterRahmen components=fenster> <HomeScreen /> </FensterRahmen> }// fenster.js name: 'Home Screen' component: HomeScreen name: 'FancyButton' component: FancyButton FensterRahmen
The wrapper around your app. It controls the currently visible component (children or an active fenster).
components
Array of objects { group, name, component }.
group(string, optional) allows you to group fensters. If you provide no group, it will show the component under "Components".name(string, required) is the display name in the list of fensters.component(React component, required) is the component to render.
Default: []
Example:
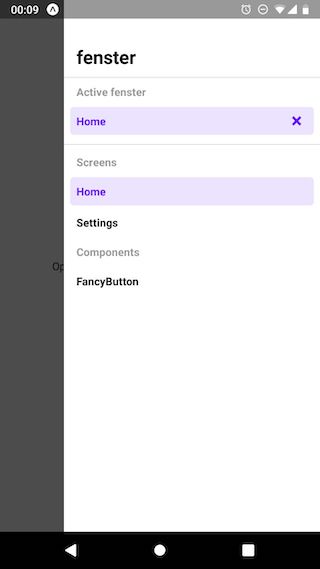
const components = group: 'Screens' name: 'Home' component: HomeScreen group: 'Screens' name: 'Settings' component: SettingsScreen name: 'FancyButton' component: FancyButton <FensterRahmen components=fenster> /* ... */</FensterRahmen>You can also use FensterGroup to write your fenster components in a more
convenient way.
const screens = 'Screens' screensscreens const components = screens name: 'FancyButton' component: FancyButton <FensterRahmen components=fenster> /* ... */</FensterRahmen>frame
Render prop for the wrapper around the active component inside fenster.
Default: ({ children }) => children
Example:
const renderFrame = <ReactFragment> <StatusBar barStyle="dark-content" backgroundColor="white" /> children </ReactFragment> <FensterRahmen frame=renderFrame> /* ... */</FensterRahmen>Usage
Open the fenster UI by swiping from right to left at the bottom of the screen.
Close the active fenster by pressing the × next to the active component
name.

License
MIT © Timo Mämecke