Syntactically-natural, "magic" markup componentization — specialized for Alpine JS.
Presto JS — Utility Preview
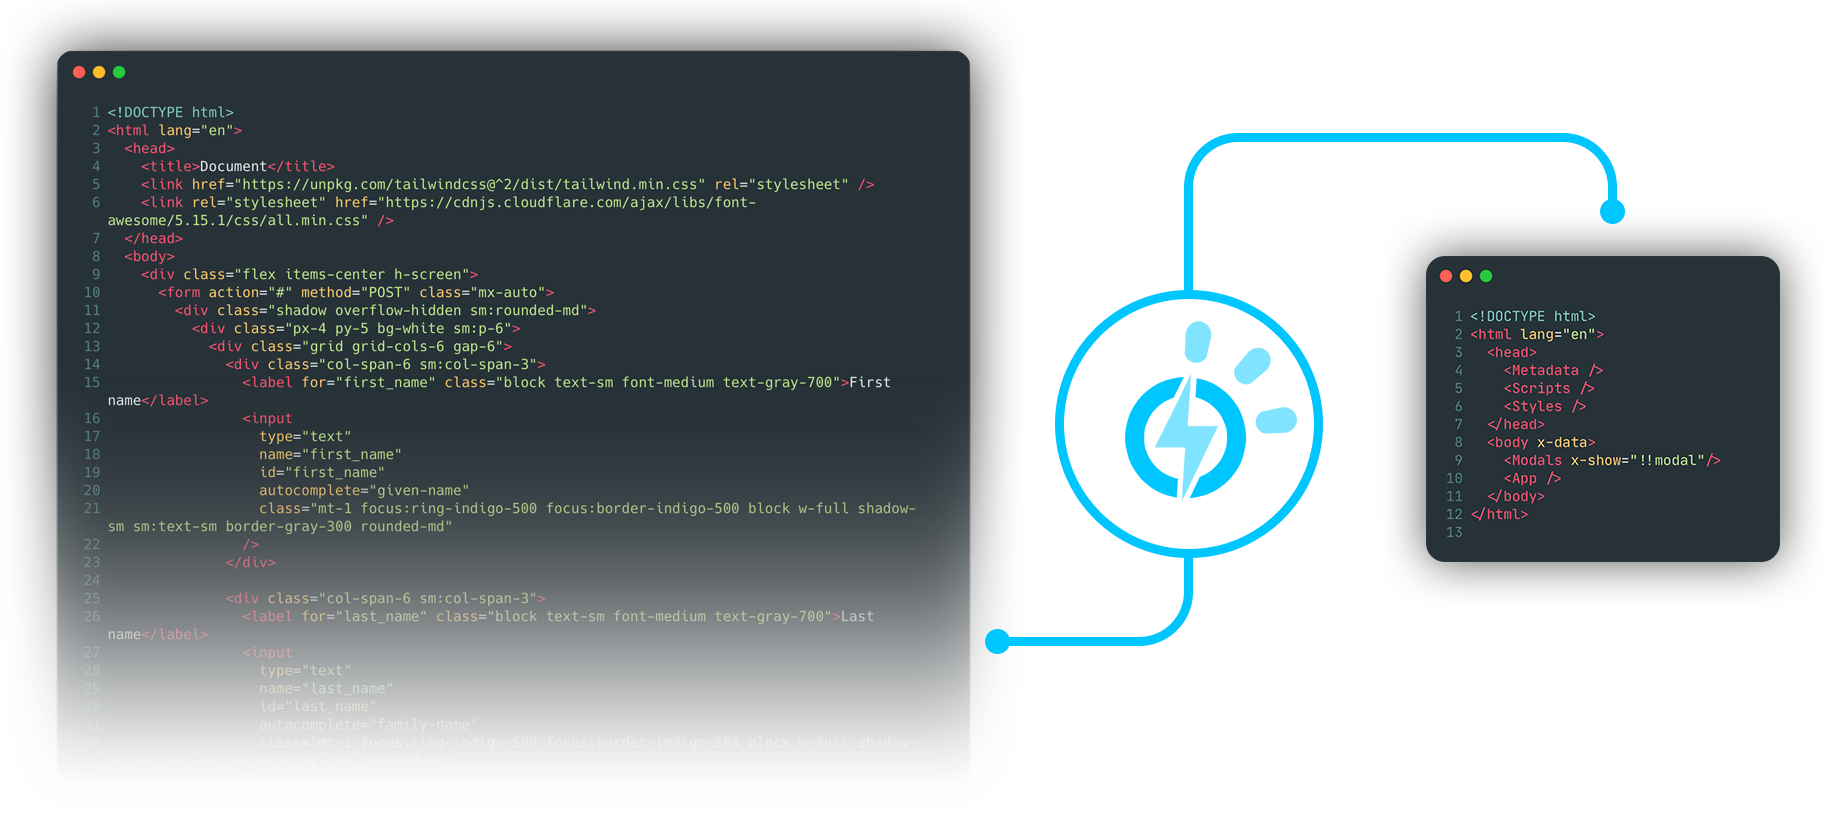
Presto offers you componentization of HTML elements — similar to the import/export nature of ES6 modules.
Think of it like Rollup for HTML.
Presto is currently under active initial development and available only for preview in its compiled "dist" state. As such, pull requests are not being considered at this time. However, bug reports, feedback, and feature requests are encouraged — the goal of this repository is to create an open discussion. Please submit any considerations of this nature as issues here on GitHub.
Why?
Presto was inspired by Alpine.js, which offers developers the ability to leverage a fully-reactive framework via attributes sprinkled into your existing markup like x-for, x-text, or x-on:click. Using Alpine in-tandem with utility frameworks like Tailwind CSS, developers can rapidly build complete app frontends with little overhead and often without ever writing more than a single .html file.
This ease of use has the potential to come at a cost however, as the HTML source starts to grow very rapidly and with considerable redundancy — especially for SPA-type applications.
The goal of Presto is to break-down your app's HTML into smaller and reusable components without forcing you into adopting a new syntax like Vue or React's JSX. Already have most of your frontend built? Great! Presto works with the HTML you already have. All you have to do is extract the components that you want to reuse and organize.
Why not use React or Vue?
As developers, we each typically have a framework of choice when it comes to creating application views. Each framework comes with its own idiosyncracies; workflows; dependencies; and, often times, a learning curve. Tools like Alpine and Tailwind CSS leverage the universal familiarity of HTML and enable developers to accomplish a bulk of their frontend development in one place, the markup — an approach that is both rapid and increasingly "instinctive" in its execution.
Presto aims to build on that universal familiarity and seeks to make mangement of frontend components syntactically-natural, central, and accessible to everyone.
Demo App and Video Intro
If you're like most developers and prefer to learn through examples, the Presto demo app, Expresslane, is available here, and the intro video can be viewed on YouTube here.
Install
From npm: Install the CLI tool from npm.
npm i presto --save-devConfig
Inside of a Node environment, Presto is a command line utility accessible using the npm command presto with a configuration file that you specify. Create a presto.config.js file in your project's root:
presto.config.js
// REQUIRED : Object | Array<Object>
export default {
    // REQUIRED : string
    // Where to begin compiling -- this should be where your <body> element is
    input: 'resources/presto/views/index.html',

    // Optional : Array<string> | string
    // Path(s) to components that should be universally available
    include: [
        'resources/presto/shared/**/*.html'
    ],

    // REQUIRED : Object | Array<Object>
    // Specifies the compiled output path and its property variations
    output: {
        // REQUIRED: string
        // Specifies the compiled output path
        file: 'resources/views/index.html',

        // Optional : Object [{} (default)]
        // Specifies property values which are globally-available to components
        // without requiring redundant application on component expressions
        // (e.g. colours, sizes, etc.)
        props: {
            buttonColor: 'red',
        },

        // Optional : Object [{} (default)]
        // Specifies, as an object of functions accepting a single argument,
        // functions which manipulate the computation of expression properties
        pipes: {
            TailwindMxAlign(arg) {
                return {
                    left: 'mr-auto',
                    center: 'mx-auto',
                    right: 'ml-auto'
                }[arg === '' ? 'center' : arg];
            }
        }
    }
}
npx presto --init
To provision a basic configuration file, with optional sample components, you can use the --init option in your project's directory:
npx presto --initExtending the Config File
By using a JS file as the configuration object, Presto enables developers the ability to leverage the object-oriented nature of JavaScript. In this way, you can declare things like include, props, or pipes as constants, and then pass them into as many or as few config objects that need them:
presto.config.js
const include = [
    'resources/presto/shared/**/*.html'
];

const props = {
    buttonColor: 'red',
    background: 'bg-gray-100'
};

const pipes = {
    TailwindMxAlign(arg) {
        return {
            left: 'mr-auto',
            center: 'mx-auto',
            right: 'ml-auto'
        }[arg === '' ? 'center' : arg];
    }
};

export default [
    {
        input: 'resources/presto/views/app.html',
        include, // assigned from const
        output: {
            file: 'resources/views/app.html',
            props, // assigned from const
            pipes, // assigned from const
        }
    },

    /* ... */

    {
        input: 'resources/presto/views/dashboard.html',
        include, // assigned from const
        output: {
            file: 'resources/views/dashboard.html',
            props, // assigned from const
            pipes, // assigned from const
        }
    }
]
Usage
When run on its own, the presto command, by default, will look in your project's root directory for a presto.config.js file. If you wish to specify a different file for various build types, you may use the --config or -c switch to specify a different config:
presto --config presto.config.prod.js
presto --config presto.config.dev.js
As part of your development workflow, Presto can be used with npm-run-all to compile your DOM with each build:
Example in TypeScript environment:
"scripts": {
    "compile:dom": "presto --config presto.config.js",
    "transpile": "tsc -p ./tsconfig.json",
    "clean": "rimraf ./dist",
    "build": "npm-run-all clean transpile compile:dom"
}
File-watching with Nodemon
Eventually, the intention is to use implement the Chokidar file-watcher library to allow for a single command, presto --watch, to run in the background during component development. In this way, as each component is modified and saved, Presto will recompile to reflect changes.
For now, your development workspace can be configured to work with Nodemon watching your Presto directory:
package.json
{
    "scripts": {
        "watch": "nodemon --watch ./src/presto -e html --exec \"npx presto\"",
    }
}
Overview
Expression of components in Presto starts by declaring a component definition with native HTML, and then expressing that component in your markup through use of a syntactically-natural custom tag that you define. Starting from the input document in your config, your markup will be compiled as each component is referenced, expressed, and rendered.
Input Documents
Presto output begins with one item, an input document specified as the input property of a config object in presto.config.js. From this input document, Presto will cascade through any component expressions and render them as HTML where they are written. A sample input document might look something like this:
<!DOCTYPE html>
<link presto href="../components/app.html">
<link presto href="../components/documenthead.html">
<html>
    <head>
        <DocumentHead />
    </head>
    <body class="w-screen h-screen">
        <App />
    </body>
</html>
As promised, the syntax is plain old HTML. The only difference is that we've included components for Presto to reference and render. This is first done by referencing the components using standard <link> tags with an empty presto attribute:
<link presto href="./components/app.html">
<link presto href="./components/documenthead.html">
Think of these <link> tags like ES6 import statements. Next, the components are told where to render within the document by expressing each component's custom tag:
<!-- ... -->
    <DocumentHead />
<!-- ... -->
    <App />
<!-- ... -->
Why use a generic
<link>tag instead of a custom tag?To take advantage of IDE and editor logic/formatting. Most editors' language servers will offer auto-completion of paths expressed on the
hrefattribute of a<link>tag. This makes it easier for you to ensure that you've typed the correct path to your imported component.Eventually, I'd like to extend the existing HTML LSP-compliant language server in VSCode to help with auto-completion of component names and, where necessary, rewriting of component imports when project assets are reorganized. If anyone reading this has experience with LSP in VSCode, and would like to help, please contact me via DM on Twitter.
Config-provided Components
If you've defined a string or array of strings on the include property of presto.config.js, you don't need to express your component imports using <link> tags for those component documents which match your given Glob patterns. In the case that a config-provided component has a name conflict with an import-provided component expressed via <link> tag, Presto will use the import-provided component when resolving a component expression.
Unique Component Names
While making use of import-provided components allows for duplicating component names, this is a practice against which I strongly recommend in most cases. However, an exception to this could be if you were defining a custom table component. In such an instance, you may want to have
<Cell> Data </Cell>expressed differently under<TableHeader>than you would if it were expressed under<TableRow>.
🚨 Readme/Documentation Pragma 🚨
The remainder of this README will be written under the assumption that all components are import-provided, but it should be noted that this is not necessary, and you can provide all of your components using the include property on your config object, making things much easier. Use Presto how you want to use it, in whatever way makes your project easier.
Component Documents
The input document example included a link to the component ./app.html and then expressed it as <App /> within the markup. For this to render correctly, there needs to be a component file present at ./app.html, relative to the index document:
app.html
<meta presto name="App">
<link presto href="./components/modal.html">
<link presto href="./components/sidebar.html">
<link presto href="./components/navigation.html">
<link presto href="./components/editor.html">

<div class="flex flex-col h-screen">
    <Modal />
    <Navigation />
    <div class="flex flex-1 items-center">
        <Sidebar class="w-32"/>
        <Editor class="flex-1" />
    </div>
</div>
A lot is happening here, but let's start from the top to understand what's being expressed. Most critically, the component document starts with a <meta> tag that provides a handle for the component we're defining — in this case, we're defining an app component that will be expressed as <App />, so the name attribute of our tag is set to "App". The full tag is expressed as:
<meta presto name="App">For each component name, use of PascalCase (like ES6 classes) is recommended to aid in syntactic visibility, but this is optional and completely up to you. Presto component tags are case-sensitive, so if you declare a component as App, it must be expressed as <App />, and not as <app />.
Case-insensitive Code Formatters
Some code formatters will drop capital letters in HTML tag names, especially those names which match existing standards-compliant tags. While Presto recognizes the difference between
<Head>and<head>or<Table>and<table>, you may find that your code formatter replaces upper-cased tag names with lower-cased equivalents.If you're using Prettier, you will not experience an issue with casing unless you attempt to express a component using an upper-case name that matches an existing standard HTML tag.
Component Nesting
Below the <meta> tag, several <link> tags have been specified. Each of these will correspond to a component document that expresses its export via a <meta presto name="...">, similar to the one defined for the App component.
Within the body of the App component, there's a mix of native markup as well as Presto component expressions. In this way, a component can yield its HTML wherever it's needed in a document — nested inside of as many or as few expressions as is desired.
Component Attributes
In the example App component document, notice that the Sidebar and Timeline expressions have class attributes applied to them. In this case, we're making use of Tailwind CSS to define the width of each component inside of their parent <div>. This is a critical aspect of Presto and one that makes component reusability so versatile. To take a look at how this is applied, let's examine the content of an example sidebar.html component:
<meta presto name="Sidebar">
<link presto href="./notethumbnail.html">

<div class="flex flex-col flex-1 h-0">
    <div class="flex items-center p-2 text-xl">
        <span>All Notes</span>
    </div>
    <div class="flex flex-col flex-1 h-0 pt-2 border-t gap-y-2 overflow-y-scroll">
        <NoteThumbnail
            ::showPreview
            ::size="large"
            $$wrap="template"
            x-for="note in notes"
        />
    </div>
</div>
If you're unfamiliar with Tailwind CSS, the classes we've applied to the inner <div> in App containing our Sidebar and Editor components provide for a space that occupies the entirety of the browser below the Navigation component — we'll call this space the "content" area. Then, the classes applied to the wrapping <div> in Sidebar provide for a space that occupies the entire height and width of the content area.
*The
Modalcomponent isposition: absolute;and does not count against our app's vertical space.
However, the sidebar component is just that, a sidebar. It shouldn't occupy the entire content area – only a space to the side of it. By passing the w-32 class in the class attribute for Sidebar in App, Presto will add w-32 to the class attribute of the wrapping <div> in Sidebar when it renders its HTML for App. The Tailwind CSS class w-32 will limit the width of Sidebar to 8rem, leaving the remaining space in the content area to be occupied by Editor, on which we've applied a Tailwind CSS class of flex-1.
In this way, our sidebar component can be reused anywhere throughout our app. Attributes that need to be modified based on context can be applied onto the component expression itself rather than hard-coded into the component definition.
Component Wrapping - $$wrap
Looking at the component document for Sidebar, you might have noticed that the component expression for NoteThumbnail is looking a little busy. In addition to applying an attribute for Alpine, x-for, the component expression also has a few attributes specific to Presto. To understand what each of these attributes does, let's look at the component document that the NoteThumbnail expression references:
notethumbnail.html
<meta
    presto
    name="NoteThumbnail"
    ::showPreview="hidden"
    ::showCheck="hidden"
    ::size="medium"
>

<script presto>
    function size(arg) {
        return {
            large: 'h-16',
            medium: 'h-8',
            small: 'h-4',
        }[arg];
    }
</script>

<div class="flex items-center p-2 {{ size | size}}">
    <div class="flex items-center w-4 {{ showCheck }}">
        <input
            type="checkbox"
            class="p-2 mx-auto"
        />
    </div>
    <div class="flex flex-col">
        <div class="text-lg font-semibold" x-text="note.header"></div>
        <div class="text-xs truncate {{ showPreview }}" x-text="note.content"></div>
    </div>
</div>
Considering the component definition for App, we already know that any attributes we apply to a component expression will be applied to the root element within that component. However, those familiar with Alpine know that the x-for attribute can only be applied to a <template> element, and the component definition for NoteThumbnail uses a <div> as its root.
We could just wrap the root <div> inside of a <template> within the component definition, but suppose we want to use our thumbnail component elsewhere within our app? With it wrapped inside of a <template> tag, we might lose the ability to reuse it. Instead, the expression for NoteThumbnail in Sidebar applies the Presto $$wrap attribute, which will wrap the component definition in a specified tag (in this case, a <template> tag) before applying any additional attribute logic. In this way, when the component's HTML is rendered, it will look like this:
<template x-for="note in notes">
    <div class="flex items-center p-2 h-16">
        <div class="flex items-center w-4 hidden">
            <input
                type="checkbox"
                class="p-2 mx-auto"
            />
        </div>
        <div class="flex flex-col">
            <div class="text-lg font-semibold" x-text="note.header"></div>
            <div class="text-xs truncate " x-text="note.content"></div>
        </div>
    </div>
</template>
Notice that Presto applied the attribute x-for to the specified wrapper, and not directly onto the <div> inside the component definition. This is determined by the order in which attributes are declared. When using $$wrap, any attributes that are declared after $$wrap is established will be coalesced onto the wrapper element, and not onto the component's root element.
Component Properties — {{ propName }}
Examining that output, did you notice anything else? The class attribute for the last <div> contained some mustache syntax as {{ showPreview }} which was rendered as:
<div class="text-xs truncate " x-text="note.content"></div>This is because a property was passed in the component expression for NoteThumbnail as ::showPreview. Presto components can receive properties using the syntax ::propName="value" on a component expression. Within the component, these property values are yielded using property tokens:
<!-- Expressed as given -->
     {{ propName }}

<!-- Evaluated by pipe function before expression -->
     {{ propName | pipeName }}
Within the <meta> of the component definition, property defaults can be given that are used when the component expression is absent of said property:
<meta
    presto
    name="NoteThumbnail"
    ::showPreview="hidden"
    ::showCheck="hidden"
    ::size="medium"
>
For the property showPreview, a default value of "hidden" is given (display: none; in Tailwind CSS), but on the component expression for NoteThumbnail, this is overriden to an empty value as ::showPreview. In this way, you can make use of "boolean-style" properties for your components, where a truthy or falsy value is the property default that gets overriden by an empty value on a component expression.
Component Property Pipes — {{ propName | pipeName }}
Reviewing the component expression for NoteThumbnail you'll notice that the ::size property was passed as "large", but was rendered as:
<div class="flex items-center p-2 h-8">In this case, before size was expressed, it was processed by a pipe — a function accepting a single argument and returning a string:
function size(arg) {
    return {
        large: 'h-16',
        medium: 'h-8',
        small: 'h-4',
    }[arg];
}
Pipes can be useful where you'd like to use more "natural" language to express complex strings of data. In NoteThumbnail it's being used to convert values of large, medium, and small into Tailwind CSS height classes. Back in the example presto.config.js, the pipe TailwindMxAlign is defined to convert left, right, and center into their margin equivalents — useful when making use of flexbox:
TailwindMxAlign(arg) {
    return {
        left: 'mr-auto',
        center: 'mx-auto',
        right: 'ml-auto'
    }[arg === '' ? 'center' : arg];
}
As you've probably noticed, there's two places where pipes can be defined. Where a pipe is only needed for a single component, it can be declared in a <script> tag with an empty presto attribute, written inside of the component document. If a pipe is going to be reused in several components, it can be declared on the pipes property of the output property of presto.config.js.
The
functionKeyword in Component-scoped PipesIf you're declaring a component-scoped pipe, you must declare your pipe at the root of
<script>and provide thefunctionkeyword right before the pipe declaration. Component-scoped pipes are converted to named exports and then transpiled by Babel. Don't worry — to save time, pipes are cached, and this process only takes place when you change something in the content of<script presto></script>.
Slots
Component slots in Presto work exactly as you'd expect. As of this writing, Presto supports one type of slot — the default slot. Named slots are under consideration, so if you'd like to see more development on this, please suggest an implementation strategy by raising an issue.
Within a component document, a default slot can be expressed using the <slot> tag with an empty presto attribute:
<!-- ... -->
    <slot presto> Some default content goes here. </slot>
<!-- ... -->
When using a component expression, the <slot> will be fulfilled by including markup between the expression's tags:
<!-- ... -->
    <MyComponent>
        This is my slot content.
    </MyComponent>
<!-- ... -->
If no content is supplied, Presto will render the default content expressed between the <slot> tags in the component definition.
Slots and Properties
Suppose you've defined a button component that you want to use with a slot:
basicbutton.html
<meta presto name="BasicButton" ::fill="green" ::label ::width="full" />

<button
  type="button"
  class="py-2 px-4 bg-{{ fill }}-500 border border-{{ fill }}-500 hover:bg-{{ fill }}-400 text-white transition ease-in duration-200 text-center text-base font-semibold rounded-lg w-{{ width }}"
>
  <slot presto>{{ label }}</slot>
</button>
When you use the BasicButton expression, you could fulfill the button's label in one of two ways:
<!-- Slot Fulfillment -->
<BasicButton> Click Me! </BasicButton>

<!-- Property Value -->
<BasicButton ::label="Click Me!" />
This works because slot processing is the second step that takes place when parsing a component expression — right after the $$wrap attribute is evaluated. Because the default slot content is the property token {{ label }}, Presto will have access to substitute a given value when evaluating the expression-assigned property ::label.
Why would you want to do this?
Using a property token as the default slot content can be helpful if you want the ability to globally-manipulate a component's slotted content. Through the use of config-provided property values, you can manage slot content in one location.
This is also really useful for when using magic properties with Alpine, so please keep reading!
Magic Properties
Saving the best for last, magic properties are what make Presto the perfect companion for Alpine developers. Consider the BasicButton component definition described above. If you wanted to make it more "Alpine-friendly," you could make some changes:
<meta presto name="BasicButton" ::fill="'green'" ::label ::width="'full'" />

<button
  type="button"
  x-bind:class="`py-2 px-4 bg-${ {{ fill }} }-500 border border-${ {{ fill }} }-500 hover:bg-${ {{ fill }} }-400 text-white transition ease-in duration-200 text-center text-base font-semibold rounded-lg w-${ {{ width }} }`"
  x-text="{{ label }}"
></button>
Then, when iterating with x-for, your component expression would look something like this:
<!-- ... -->
    <BasicButton ::label="b.label" ::fill="b.color" ::width="'24'" $$wrap="template" x-for="b in buttons" />
<!-- ... -->
That works, but it's less than ideal. In the component definition, you've had to do a lot of escaping and now, if you want to reuse the button outside of an Alpine context, you can't because class is declared as x-bind:class and the button's label is expressed as x-text rather than native HTML. Additionally, you now have to surround static property values with single quotes, like the default values for fill and width.
Is there a better way? Of course there is.
A Little Bit of Magic ✨
Let's restore the original version of the BasicButton definition:
<meta presto name="BasicButton" ::fill="green" ::label ::width="full" />

<button
  type="button"
  class="py-2 px-4 bg-{{ fill }}-500 border border-{{ fill }}-500 hover:bg-{{ fill }}-400 text-white transition ease-in duration-200 text-center text-base font-semibold rounded-lg w-{{ width }}"
>
  <slot presto>{{ label }}</slot>
</button>
Now, instead of mangling the component definition, let's instead change the way that we write the component expression:
<!-- ... -->
    <BasicButton ::$label="b.label" ::$fill="b.color" ::width="24" $$wrap="template" x-for="b in buttons" />
<!-- ... -->
Take note of the $ chars added to the expression properties label and fill. When Presto compiles, this is what you'll see:
<template x-for="b in buttons">
  <button
    type="button"
    x-html="`${b.label}`"
    x-bind:class="`py-2 px-4 bg-${b.color}-500 border border-${b.color}-500 hover:bg-${b.color}-400 text-white transition ease-in duration-200 text-center text-base font-semibold rounded-lg w-24`"
  ></button>
</template>
Take a very close look at what's happened:
- The Alpine
x-htmlattribute has been added to the<button>element and will apply theb.labelvalue at runtime. - The
classattribute has been converted tox-bind:classand its value has been enclosed in backtick`template literal chars. - Where the
fillproperty is expressed inclass, it's been enclosed as a template literal placeholder${...}that will apply theb.colorvalue at runtime. - Where the
widthproperty is expressed inclass, it's been left alone as a string literal.
Using magic properties, you can take the components you already have or components from existing toolkits (like TailwindToolbox) and, with almost no effort, make them ready for your Alpine-powered frontend while still retaining their usability outside of Alpine's x-data scope.
How does this work?
Presto is "context-aware" — meaning that it can tell when a property is being expressed inside of an element's attribute or inside of its
innerHTMLvalue. Additionally, it's aware of those attributes which are necessary for Alpine to do its work, likex-html,x-text, or anything prefixed withx-bind:.
A Little More Magic ✨ ✨
Suppose you grab a an icon button from a toolkit and replace its static content with component properties to define IconButton like this:
<meta presto name="IconButton" ::fill="green" ::icon ::label ::width="full" />

<button
  type="button"
  class="py-2 px-4 bg-{{ fill }}-500 border border-{{ fill }}-500 hover:bg-{{ fill }}-400 text-white transition ease-in duration-200 text-center text-base font-semibold rounded-lg w-{{ width }}"
>
  <i class="fas fa-{{ icon }} mr-1 text-xl"></i>{{ label }}
</button>
At first glance, there doesn't seem to be anything wrong, but within the innerHTML of <button> there's some interesting considerations for Presto:
- A property token,
{{ label }}, is inline with static HTML. - Within that static HTML next to a property token, another property token,
{{ icon }}, is inside of an attribute.
For standard Presto expression properties, this is a simple case of substitution, and nothing about which to worry. With Alpine, however, there's more to consider. If you want to dynamically set the property of label and icon, you'd need to wrap {{ label }} inside of a <div> or <span>, so that it can be assigned x-html, right?
Not with magic properties! Leaving things as they are, let's write our component expression:
<!-- ... -->
    <BasicButton ::$icon="b.icon" ::$label="b.label" ::$fill="b.color" ::width="24" $$wrap="template" x-for="b in buttons" />
<!-- ... -->
When Presto compiles, this is what you'll see:
<template x-for="b in buttons"
><button
type="button"
x-bind:class="`py-2 px-4 bg-${b.color}-500 border border-${b.color}-500 hover:bg-${b.color}-400 text-white transition ease-in duration-200 text-center text-base font-semibold rounded-lg w-24`"
x-html='`
<i class="fas fa-${b.icon} mr-1 text-xl"></i>${b.label}
`'
></button>
</template>
Take a close look at what Presto did with x-html:
- Like before, the value is wrapped as a template literal with
`chars. - Where a dynamic expression is required, it's wrapped as a template literal placeholder
${...}. - Most importantly, the entire content of the
innerHTMLof<button>has been escaped into HTML-safe chars that will render exactly as you require at runtime. Alpine writes each element to the DOM at runtime, and the browser doesn't know any differently.
Just because you can, should you?
Probably not.
I wrote this feature into Presto because it felt like something that should be there, but when debugging an app, the less complexity there is, the better. If you don't mind taking the extra 1.2 seconds required to wrap your property token inside a
<span>element, you may save yourself some time if you ever need to dive into the browser inspector.
Attribute Coalescence Control
You've already seen that Presto can coalesce attributes onto the root elements of a component definition. This makes it easy to leverage utility frameworks like Tailwind CSS to create variants of existing components. To even further reduce redundancy, we can extend this behavior using action attributes.
$$provides, $$reserves, $$accepts, $$rejects
As you begin breaking-down your application's markup into recyclable components, you're likely to find that you have a need to begin nesting fundamental components within others to create variations without redundancy. Consider an input-based example where we have two components, BasicInput and LabeledInput:
basicinput.html
<meta
  presto
  name="BasicInput"
  ::placeholder
  ::value
  ::color="green"
/>

<input
  type="text"
  value="{{ value }}"
  class="rounded-lg border-transparent flex-1 appearance-none border border-gray-300 fw-full py-2 px-4 bg-white text-gray-700 placeholder-gray-400 text-base focus:outline-none focus:border-{{ color }}-400"
  placeholder="{{ placeholder }}"
/>
labeledinput.html
<meta
  presto
  name="LabeledInput"
  ::label
  ::placeholder
  ::value
  ::color="green"
/>

<div>
  <div class="pl-1 text-sm text-gray-700">{{ label }}</div>
  <BasicInput class="w-full" ::placeholder="{{ placeholder }}" ::value="{{ value }}" ::color="{{ color }}" ::width="{{ width }}" />
</div>
The component definition for LabeledInput establishes an expression for BasicInput, and explicitly re-declares all of the properties that could be passed onto it. There's nothing wrong with this, and it would indeed work, but it also creates redundancy and requires you to update two component definitions if you decide to change the property declarations on one.
Instead of explicitly re-declaring, you can make use of any combination of Presto action attributes to do the heavy lifting for you, let's rewrite our definition for LabeledInput, using the action attributes $$provides, $$reserves, $$accepts, and $$declared:
labeledinput.html
<meta
  presto
  name="LabeledInput"
  ::label
  $$provides
  $$reserves="$$declared"
/>

<div>
  <div class="pl-1 text-sm text-gray-700" $$accepts="class">{{ label }}</div>
  <BasicInput class="w-full" $$accepts $$rejects="class" />
</div>
With our new action attributes in-place, we can now write our component expression for LabeledInput as:
<LabeledInput ::label="First Name" ::placeholder="John" ::$value="user.firstName" />Let's break down what each action attribute does for us:
- The
$$providesattribute, declared with no value, tells Presto that any attributes (property, magic, or plain-old HTML) should not be applied to the markup forLabeledInput, but should be held for distribution to elements contained within.- If we wanted to be specific, we could write the value of
$$providesas$$provides="::placeholder ::value ::color ::width", which would explicitly pass-on only those attributes — retaining the rest for property expression or coalescence.
- If we wanted to be specific, we could write the value of
- The
$$reservesattribute, with a value of$$declared, tells Presto that while we're passing-on any attribute given on an expression ofLabeledInput, we still want to keep to value of any declared properties so that they can be expressed in the markup forLabeledInput.- Like
$$provides, giving an empty value for$$reservesacts as a wildcard — retaining all attributes given onLabeledInputfor property expression or coalescence. - The
$$declaredkeyword can only be used in the value for$$reservesor$$accepts. It has no effect in$$provides.
- Like
- The
$$acceptsattribute, declared with no value, tells Presto that any attributes collected by$$providesshould be coalesced onto the expression forBasicInput. Again, this works for both properties, magic properties, and plain-old HTML.- Like
$$providesand$$reserves, we can also be explicit in the way that we use$$accepts. If desired, we could write$$accepts="::placeholder ::value ::color ::width" - Expression of the
$$acceptsattribute can be done multiple times throughout a component definition, and on both component expressions as well as standard HTML elements.
- Like
- The
$$acceptsattribute, declared as$$accepts="class"ensure's that any declaration for class onLabeledInputis passed on to our wrapping<div>. In this way, we can express with of our component using Tailwind'sw-XXclasses. - The
$$rejectsproperty, declared as$$rejects="class"ensures that we don't pass on the class declarations we intend to use on the wrapping<div>only.
In this way, whether you provide an attribute using property syntax, magic syntax, or plain-old HTML, you can tell Presto where you want your declarations to go.
Implied Coalescence Control: $$utilizes
Using $$provides and $$accepts is easy enough, but it still exposes us to the potential for added redundancy. Suppose we intend to use BasicInput in more than one component. We'd have to write a $$provides and $$accepts attribute for each occurence — leading to fragmented control.
Instead, where we can anticipate desired attribute coalescence, we can make use of the $$utilizes attribute to keep things terse. Let's rewrite the definition for BasicInput and assume we have another component, BasicButton that we're going to use in a new definition, OneButtonInput:
basicinput.html
<meta
  presto
  name="BasicInput"
  ::placeholder
  ::value
  ::color="green"
  ::width="full"
  $$accepts="$$declared required readonly"
/>

<input
  type="text"
  value="{{ value }}"
  class="rounded-lg border-transparent flex-1 appearance-none border border-gray-300 fw-full py-2 px-4 bg-white text-gray-700 placeholder-gray-400 text-base focus:outline-none focus:border-{{ color }}-400 w-{{ width }}"
  placeholder="{{ placeholder }}"
/>
basicbutton.html
<meta
  presto
  name="BasicButton"
  ::click
  ::label
  ::color="green"
  ::text="white"
  $$accepts="$$declared"
/>

<button
  type="button"
  class="py-2 px-4 bg-{{ color }}-500 border border-{{ color }}-500 hover:bg-{{ fill }}-400 text-{{ text }} transition ease-in duration-200 text-center text-base font-semibold rounded-lg w-24"
  onclick="{{ click }}"
>
  {{ label }}
</button>
Notice that in both definitions, we've assigned $$accepts in the <meta> tag. This indicates to Presto that every expression of our component will acquire provided attributes according to the value for $$accepts:
-
BasicInput- Acquires provided attributes
::placeholder,::value,::color, and::width, because they are implied by$$declared. - Acquires provided attributes
readonlyandrequired, because they are explicitly stated.
- Acquires provided attributes
-
BasicButton- Acquires
::click,::label,::color, and::textbecause they are implied by$$declared.
- Acquires
Let's write our component definition for OneButtonInput with these characteristics in-mind:
onebuttoninput.html
<meta presto
  name="OneButtonInput"
  $$utilizes="BasicInput BasicButton"
/>

<div class="flex">
  <BasicInput />
  <div class="flex">
    <BasicButton class="mb-auto" />
  </div>
</div>
Now, when we write a component expression for OneButtonInput, we can express the properties for BasicInput and BasicButton like this:
<OneButtonInput required ::placeholder="Search..." ::$value="searchTerm" ::label="Go" ::click="performSearch()" />In the <meta> tag for our component definition, we've established $$utilizes and referenced both BasicButton and BasicInput. This tells Presto to refer to the value of $$accepts in each given component definition. Any attributes found there will be treated as if we'd established $$provides on OneButtonInput and $$accepts on each component expression.
Explicit Coalescence Control: $$exposes
Looking at the expression for OneButtonInput, we can see that we've left-out a few declared properties and, if we look closely look at the definitions for BasicButton and BasicInput, we can see that the property color is declared in both components with very different implementations. In BasicButton, color refers to the fill colour of the button, while in BasicInput, it refers to the border colour of the input field. If we tried to establish ::color on <OneButtonInput>, Presto would pass on the property to both components, and we may not like what we see.
Instead, we can use the $$exposes attribute to designate a prefix controlling attribute coalescence. Consider an example that uses both BasicInput and two expressions of BasicButton:
twobuttoninput.html
<meta presto name="TwoButtonInput" $$utilizes="BasicInput"/>

<div class="flex space-x-2">
  <BasicInput $$exposes="input" />
  <BasicButton $$exposes="b1" class="mb-auto" />
  <BasicButton $$exposes="b2" class="mb-auto" />
</div><TwoButtonInput
required
::$value="username"
::placeholder="@johndoe"
input|::color="blue"
b1|::click="validateUsername()"
b1|::color="gray"
b2|::click="submitUsername()"
b2|::color="blue"
/>On each instance of BasicButton and BasicInput, the $$exposes attribute provides a moniker through which each individual expression can be addressed. On the component expression for TwoButtonInput, this is done by concatenating the value of each $$exposes with a pipe | char, and then the attribute we want to pass. As we're able to address each element directly, the attributes passed can be properties, magic properties, or plain-old HTML attributes.
While it's common that you'll want to pass attributes onto component expressions, you can also use $$exposes to expose standard elements as well:
<!-- In Component Definition -->
  <div $$exposes="pangram" class="text-center"> My faxed joke won a pager in the cable TV quiz show. </div>

<!-- On Component Expression -->
  <MyComponent pangram|class="font-semibold text-2xl" />

<!-- Resulting Markup -->
  <div class="text-center font-semibold text-2xl"> My faxed joke won a pager in the cable TV quiz show. </div>
Incremented Exposures: <meta presto ... $$exposes >
If you prefer a more succinct approach to component exposition, you can also establish the $$exposes attribute in the <meta> tag of a component definition:
basicbutton.html
<meta
  presto
  name="BasicButton"
  $$exposes="button"
  ::click
  ::label
  ::color="green"
  ::text="white"
  $$accepts="$$declared"
/>
<!--...-->
Now, when you use BasicButton within a component definition, you can access button|attribute="" on your expression without providing $$exposes directly. If you need multiple occurrences of BasicButton, Presto will use numeric incrementation to address each occurrence, starting from the top of your component's markup. In this way, TwoButtonInput could be written as:
twobuttoninput.html
<meta presto name="TwoButtonInput" $$utilizes="BasicInput" />

<div class="flex space-x-2">
  <BasicInput />
  <BasicButton class="mb-auto" />
  <BasicButton class="mb-auto" />
</div>
Then, assuming you also established $$exposes="input" in the definition for BasicInput, your expression of TwoButtonInput could look like this:
<TwoButtonInput
  required
  ::$value="username"
  ::placeholder="@johndoe"
  input|::color="blue"
  button|::click="validateUsername()"
  button|::color="gray"
  button2|::click="submitUsername()"
  button2|::color="blue"
/>
Indexing for incremented exposure begins at 1. If you don't provide a numeric value (like the example above), Presto assumes a value of 1 unless another element in the component definition is assigned $$exposes directly as $$exposes="button". In cases such as these, Presto would pass anything prefixed with button| onto that element, and anything prefixed with button1| onto the first instance of BasicButton.
Coalescence Control Reference
Declared Only on Component Metadata
| Attribute | Function |
|---|---|
$$provides |
Attributes matching this space-delimited list will be distributed to elements or component expressions and not coalesced onto the root component element or expressed as properties. |
$$reserves |
Attributes matching this space-delimited list will be coalesced onto the root component element or expressed as properties, and not distributed to elements or component expressions. |
$$utilizes |
The component will implement the $$provides, $$accepts, $$reserves, and $$exposes rules of component names matching this space-delimited list. |
$$declared (value) |
This is a value that can be assigned to $$reserves or $$accepts, only when expressed on component metadata. |
Declared on Either Component Metadata or Elements/Component Expressions
| Attribute | Function |
|---|---|
$$exposes |
The given value is used as a prefix in the pattern prefix|attribute="value" to edit the element or component's attributes directly. |
$$accepts |
Attributes matching this space-delimited list are received for coalescence where given by a $$providesdeclaration. |
Declared Only on Elements/Component Expresssions
| Attribute | Function — Must be used with $$accepts
|
|---|---|
$$rejects |
Attributes matching this space-delimited list will be rejected for coalescence where given by a $$provides declaration (useful when using wildcard $$accepts). |
$$revises |
Attributes matching this space-delimited list will replace (instead of coalesce with) their existing values (useful for type on <input type="text" />, etc.). |
License
Copyright © 2020-2021 Stephan Casas
Licensed under the MIT license, see LICENSE for details.
About the Project
Hi, I'm Stephan, and I'm the developer of Presto.
TL;DR
- Presto was built after I got tired of trying to learn Vue and React.
- Please be my friend.
- If you enjoy using Presto, please consider sponsoring the project.
I started work on this project in mid-December and took almost two months off of my primary job as a freelance software developer to bring the concept to life. My work on it began after a single-page report for a client's project ballooned from 50 lines of code to +1200. The report, driven by Alpine, worked flawlessly, but was severely lacking with regards to organization. After taking a phone call in which I tried to debug a discrepancy with the client in realtime, struggling to sift through a mess of #region tags and arrowhead comments just wasn't doing it for me. I wanted a better way to work.
The obvious answer was to switch to React or Vue, but both of them felt like overkill for the use case, and there was the little matter of me not knowing how to use either. After watching several Vue tutorials at Laracasts, one video's comment stuck with me:
"This is so much easier to do in Alpine."
That was the straw that broke the camel's back. He wasn't wrong. Getting up and running with Vue, especially for something as nominal as a single-page report, required a ton of overhead; a steep learning curve; and felt less than intuitive when compared with Alpine. I had everything I needed in my Alpine model — all I wanted was a little organization.
For about three nights, I scoured the Internet searching for existing solutions. Things came close, but not close enough. The goal I had in-mind was pretty basic: I didn't want to write any JavaScript — everything had to be HTML-based. No template literals, no JSX, no pragma... just pure HTML. I didn't find anything.
To me, it seemed crazy that things like Babel and WebPack existed, but nothing filled-in the transpiler gap for HTML. In reality, though, the need for something like this is a relatively fresh concept. When Caleb Porzio wrote Alpine, he introduced a new way to build reactive frontends that kept developers' work in one place: the DOM. With that in-mind, I got to work. Building something like this seemed like a great way to give back to the open-source community and an opportunity to make new friends. No, seriously, I only know like two other developers — please be my friend.
Presto is definitely still in its early stages of development. When I started the project, I wasn't familiar with TypeScript, so there's a considerable amount of refactoring to be done. As I needed Presto to work for my job, lots of "hacks" have been applied with // FIXME: comments. With a reasonably-working preview, I'll be doing what I can in the coming weeks to burn through these, and promise to open the source up for pull requests once this is completed.
In the interim, please submit ideas, feedback, bug reports and any other considerations as issues right here on GitHub. As with any open-source project, Presto is built as my work allows for it. If you enjoy using Presto, and want to see further development, please consider sponsoring the project.
Say "Hello"
| Stephan Casas | |
|---|---|
| stephancasas[at]icloud[dot]com | |
| @stephancasas | |
| @stephancasas |