![]()


Why?
Jump into the future of API design and add an orchestration layer to your APIs.
In order to understand what an orchestration layer does, take a look at the following image:
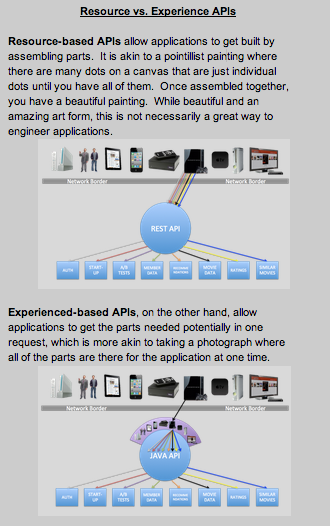
In simple words: an API Orchestration Layer (OL) is responsible for assembling different API responses
(ie. /product/123 and /product/123/reviews) at a single endpoint (ie. /view/web/product/123), so that a service
can make one single call to that endpoint and retrieve all the informations needed to render its views with
a single API call.
The advantage of this approach is that:
- you can spread the workload over multiple, concurrent requests
- you can have very clean, separate, decoupled, resource-oriented APIs on the background
If your applications uses different APIs to build user interfaces, you might want to invest on your own orchestra! And in order for an orchestra to be succesfull, it needs a very good conductor.
Not a simple conductor, the conductor.
Installation
You can simply include it via npm install the-conductor
This package follow semantic versioning, so if you want to always ensure backwards compatibility just use:
"the-conductor": "~0.1"
How it works
There are 2 main concepts that you will have to understand before using the conductor:
- resources: these are objects representing your resource-oriented APIs, that the conductor will call in order to assemble its responses
- facade: the endpoint of the conductor, a facade allows you to define which resources should be aggregated there (and a few other, minor, things, like how the conductor should assemble the responses from the sub-requests it makes)
Try it live!
After you cloned the repository, run npm install and then run the example server:
node example/index.js
then hit http://127.0.0.1:6971/example.json and see it in action: you will see some JSON which is the result of
a bunch of HTTP calls:
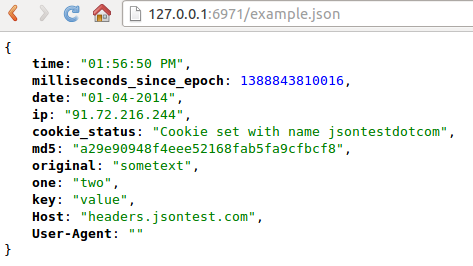
Have a look at the example folder in the source code.
Usage
Using the conductor it's a matter of a few lines of code:
var conductor = ;var http = ;http;console
and then you can simply run node yourFile.js: by default, the conductor will run on port 6971, but you can override
this setting by just specifying the port during the startup process (for example -p 8080).
Configuration
Of course, the above example won't be very helpful since we are not telling the conductor on which routes it should listen to, nor which facades to run for those routes; to do that, we simply have to 1. add some routes and 2. add facades and configure them.
In order for our conductor to respond to a request hitting http://example.org/web/view/users/john, for example, we simply need
to add a new route (the router used by the conductor is odino.router):
conductorrouter;
In this way we are telling the conductor that for whichever request that hits /web/view/users/:username it will need
to run the user_detail facade. But how do we define what the facade does?
We can simply populate the conductor.config object with these informations:
conductorconfigresources =user_details:url: "http://api.example.org/users/:username"user_friends:url: "http://api.example.org/users/:username/friends";conductorconfigfacades ='web_user_details':resources:'user_details''user_friends';
or, alternatively (recommended), dump the configuration in a more readable YML file and load it:
conductor;
The YML would then look very simple:
resources:user_detail:url: "http://api.example.org/users/:username"user_friends:url: "http://api.example.org/users/:username/friends"facades:web_user_details:resources:- user_detail- user_friends
At this point everything should be a bit clearer:
- whenever someone hits
http://example.org/web/view/users/:usernamethe conductor will match the routeweb_user_details - at that point, it will see that it needs to run the facade
user_detail - the conductor will then look into its config, finding out that it needs to hit
http://api.example.org/users/:usernameandhttp://api.example.org/users/:username/friends, assembles the responses and serve them to the client
Simple as that!
Facade strategies
A facade strategy is what the conductor runs to assemble the sub-responses it obtains from a facade's resources.
The conductor comes bundled with some very simple strategies:
- join, which simply joins all the response bodies altogether
- merge, which merges the responses (to be used with JSON responses)
In order to specify which facade strategy to use for a particular facade, simply specify it in your config:
facades:web_user_details:strategy: joinresources:- user_detail- user_friends
The join strategy can be omitted, as it's the default one.
Custom facade strategies
You can also register and use your own facade strategies by simply specifying them in your configuration and register them inside the conductor.
First, update your configuration:
facades:web_user_details:strategy: customresources: ...
then register the strategy in the conductor:
conductor;
In this example, the custom facade strategy only returns the body of the first sub-response.
Debugging help
If you start the conductor in dev environment (--env dev or -e dev) you will get some additional informations
everytime you hit an endpoint, such as a list of resources and the body of each resource the conductor hit in order to
serve the response:
~  ᐅ curl -X GET -I http://127.0.0.1:6971/example.json

HTTP/1.1 200 OK
Content-Type: text/plain
The-Conductor-Resource-ip.jsontest.com/: {"ip": "91.72.216.244"}
The-Conductor-Resource-echo.jsontest.com/key/value/one/two: {"one": "two","key": "value"}
The-Conductor-Resource-cookie.jsontest.com/: {"cookie_status": "Cookie set with name jsontestdotcom"}
The-Conductor-Resource-headers.jsontest.com/: {"Host": "headers.jsontest.com","User-Agent": ""}
The-Conductor-Resource-md5.jsontest.com/?text=sometext: {"md5": "a29e90948f4eee52168fab5fa9cfbcf8","original": "sometext"}
The-Conductor-Resource-date.jsontest.com/: {"time": "03:16:35 PM","milliseconds_since_epoch": 1388848595956,"date": "01-04-2014"}
The-Conductor-Resources: ip.jsontest.com/, echo.jsontest.com/key/value/one/two, cookie.jsontest.com/, headers.jsontest.com/, md5.jsontest.com/?text=sometext, date.jsontest.com/
The-Conductor-Runtime: 566
Connection: keep-alive
Transfer-Encoding: chunked
Tests
Tests are written with mocha and should.js: after you cloned the repo simply run mocha or its verbose cousin
./node_modules/mocha/bin/mocha and everything should be green!